Connect to the MotherDuck MCP server
The MotherDuck MCP Server lets AI assistants query and explore your databases using the Model Context Protocol (MCP). This guide walks you through connecting your preferred AI client to the remote MCP server (fully managed, zero setup). For local DuckDB files or self-hosted setups, see the local MCP server.
The remote MCP server is hosted at https://api.motherduck.com/mcp. Most clients connect through OAuth automatically; clients that need a manual configuration use this URL with an HTTP transport. You can also authenticate with an access token instead of OAuth, for example to connect as a service account.
MCP is the right tool for exploring data and answering questions in a chat client. For agents that have a shell and a filesystem, the MotherDuck CLI is more efficient for file-shaped work: reading a Dive or Flight, saving an edit, listing Dives and Flights, and exporting large results, because the output goes to disk instead of through the model's context. See choosing between the CLI and MCP. The two work well together.
Prerequisites
- A MotherDuck account (sign up free)
- An MCP-compatible AI client (Claude, ChatGPT, Cursor, Claude Code, Codex, or others)
Connect with the official MotherDuck plugin
The official MotherDuck plugin connects ChatGPT and Codex to MotherDuck so you can explore schemas, run queries, and create Dives. It configures the hosted MCP connection for you.
- Open Plugins in ChatGPT on the web or in the desktop app.
- Search for MotherDuck, open its details, and select + to install it.
- Connect your MotherDuck account when prompted.
- Start a new ChatGPT or Codex chat. Type
@and select MotherDuck, then ask "List all my databases on MotherDuck."
Confirm that the assistant calls a MotherDuck tool and returns your databases. If installation is unavailable, check your workspace's plugin settings with your administrator. See OpenAI's plugin guide for supported surfaces and access requirements.
Set up the remote MCP server
Select your MCP client and follow the instructions to connect.
- Claude
- ChatGPT
- Cursor
- Claude Code
- Gemini CLI
- GitHub Copilot (VS Code)
- Copilot Studio
- Others
- Open Claude on the web or in Claude Desktop
- Go to Customize → Connectors and click + to browse the directory
- Find MotherDuck, open its details, and click Connect
- Complete the MotherDuck authorization when prompted
After authentication, ask "List all my databases on MotherDuck" to verify the connection. If Claude doesn't use MotherDuck, open + → Connectors in the chat and enable it for that conversation.
On Claude Team and Enterprise plans, an organization owner must enable the connector before members can connect. See Claude's connector guide for organization setup.
- Open ChatGPT Plugins on the web or in the desktop app.
- Search for MotherDuck, open its details, and select + to install it.
- Connect your MotherDuck account when prompted.
- Start a new chat, type
@, select MotherDuck, and ask "List all my databases on MotherDuck."
Confirm that ChatGPT calls a MotherDuck tool and returns your databases. On Business, Enterprise, and Edu workspaces, an admin may need to allow the plugin first.
- Open Cursor Settings (
Cmd/Ctrl + ,) - Navigate to Tools & MCP
- Click + New MCP Server
- Add the following to the configuration file:
{
  "MotherDuck": {
    "url": "https://api.motherduck.com/mcp",
    "type": "http"
  }
}
- Save and click Connect to authenticate with your MotherDuck account
If you've connected MotherDuck in Claude and use a Claude account to sign in to Claude Code, run /mcp first. If MotherDuck is listed and connected, you can use it without adding another server. API-key and third-party provider sessions don't inherit these connectors; see Claude account connectors in Claude Code for details.
To configure the server directly:
- From your project directory, run the following command in your terminal:
claude mcp add --transport http MotherDuck https://api.motherduck.com/mcp
The command uses Claude Code's local scope by default: only you can use the server, and only in the current project. To make it available to you across projects, use this command instead:
claude mcp add --transport http --scope user MotherDuck https://api.motherduck.com/mcp
See the --scope documentation for project and user scope details.
- Run
claudeto start Claude Code - Type
/mcp, select MotherDuck from the list, and press Enter - Select Authenticate and confirm the authorization dialog
Ask "List all my databases on MotherDuck" and confirm that Claude calls a MotherDuck tool and returns your databases.
Set your MotherDuck token in the environment before starting Gemini CLI:
export MOTHERDUCK_TOKEN='<your_motherduck_token>'
Add this server to ~/.gemini/settings.json (or your project’s .gemini/settings.json):
{
  "mcpServers": {
    "motherduck": {
      "httpUrl": "https://api.motherduck.com/mcp",
      "headers": {
        "Authorization": "Bearer ${MOTHERDUCK_TOKEN}"
      }
    }
  }
}
Run gemini mcp list and confirm that motherduck is connected. See the Gemini CLI MCP server documentation for configuration details.
The button opens an MCP Server: MotherDuck tab with the server prefilled; nothing is added until you click Install. On VS Code Insiders, use the Insiders link instead.
Or configure GitHub Copilot in VS Code through a workspace config file:
- Open the Command Palette (
Cmd/Ctrl + Shift + P) and run MCP: Add Server to open.vscode/mcp.json. You can also create the file manually in your workspace. Add this configuration:
{
  "servers": {
    "motherduck": {
      "type": "http",
      "url": "https://api.motherduck.com/mcp"
    }
  }
}
-
Save the file and start the server from the Start code lens that appears above the
motherduckentry inmcp.json. You can also start it through the Command Palette:MCP: List Servers→ motherduck → Start Server. -
VS Code opens a browser window so you can sign in to MotherDuck through OAuth, then stores the credentials for subsequent server starts.
-
Open the Copilot Chat view, switch to Agent mode, and confirm that the MotherDuck tools appear in the tool picker. Try asking "List all my databases on MotherDuck" to verify the connection.
To authenticate with an access token instead of OAuth, see Connect to the MCP server with an access token.
Microsoft Copilot Studio is a cloud-hosted platform for building agents that run inside Microsoft 365, Teams, and other Microsoft surfaces. Because the platform runs in Microsoft's cloud, it connects to the remote MotherDuck MCP server — either with OAuth (each user signs in with their own MotherDuck account) or with a shared API key backed by a service-account token.
-
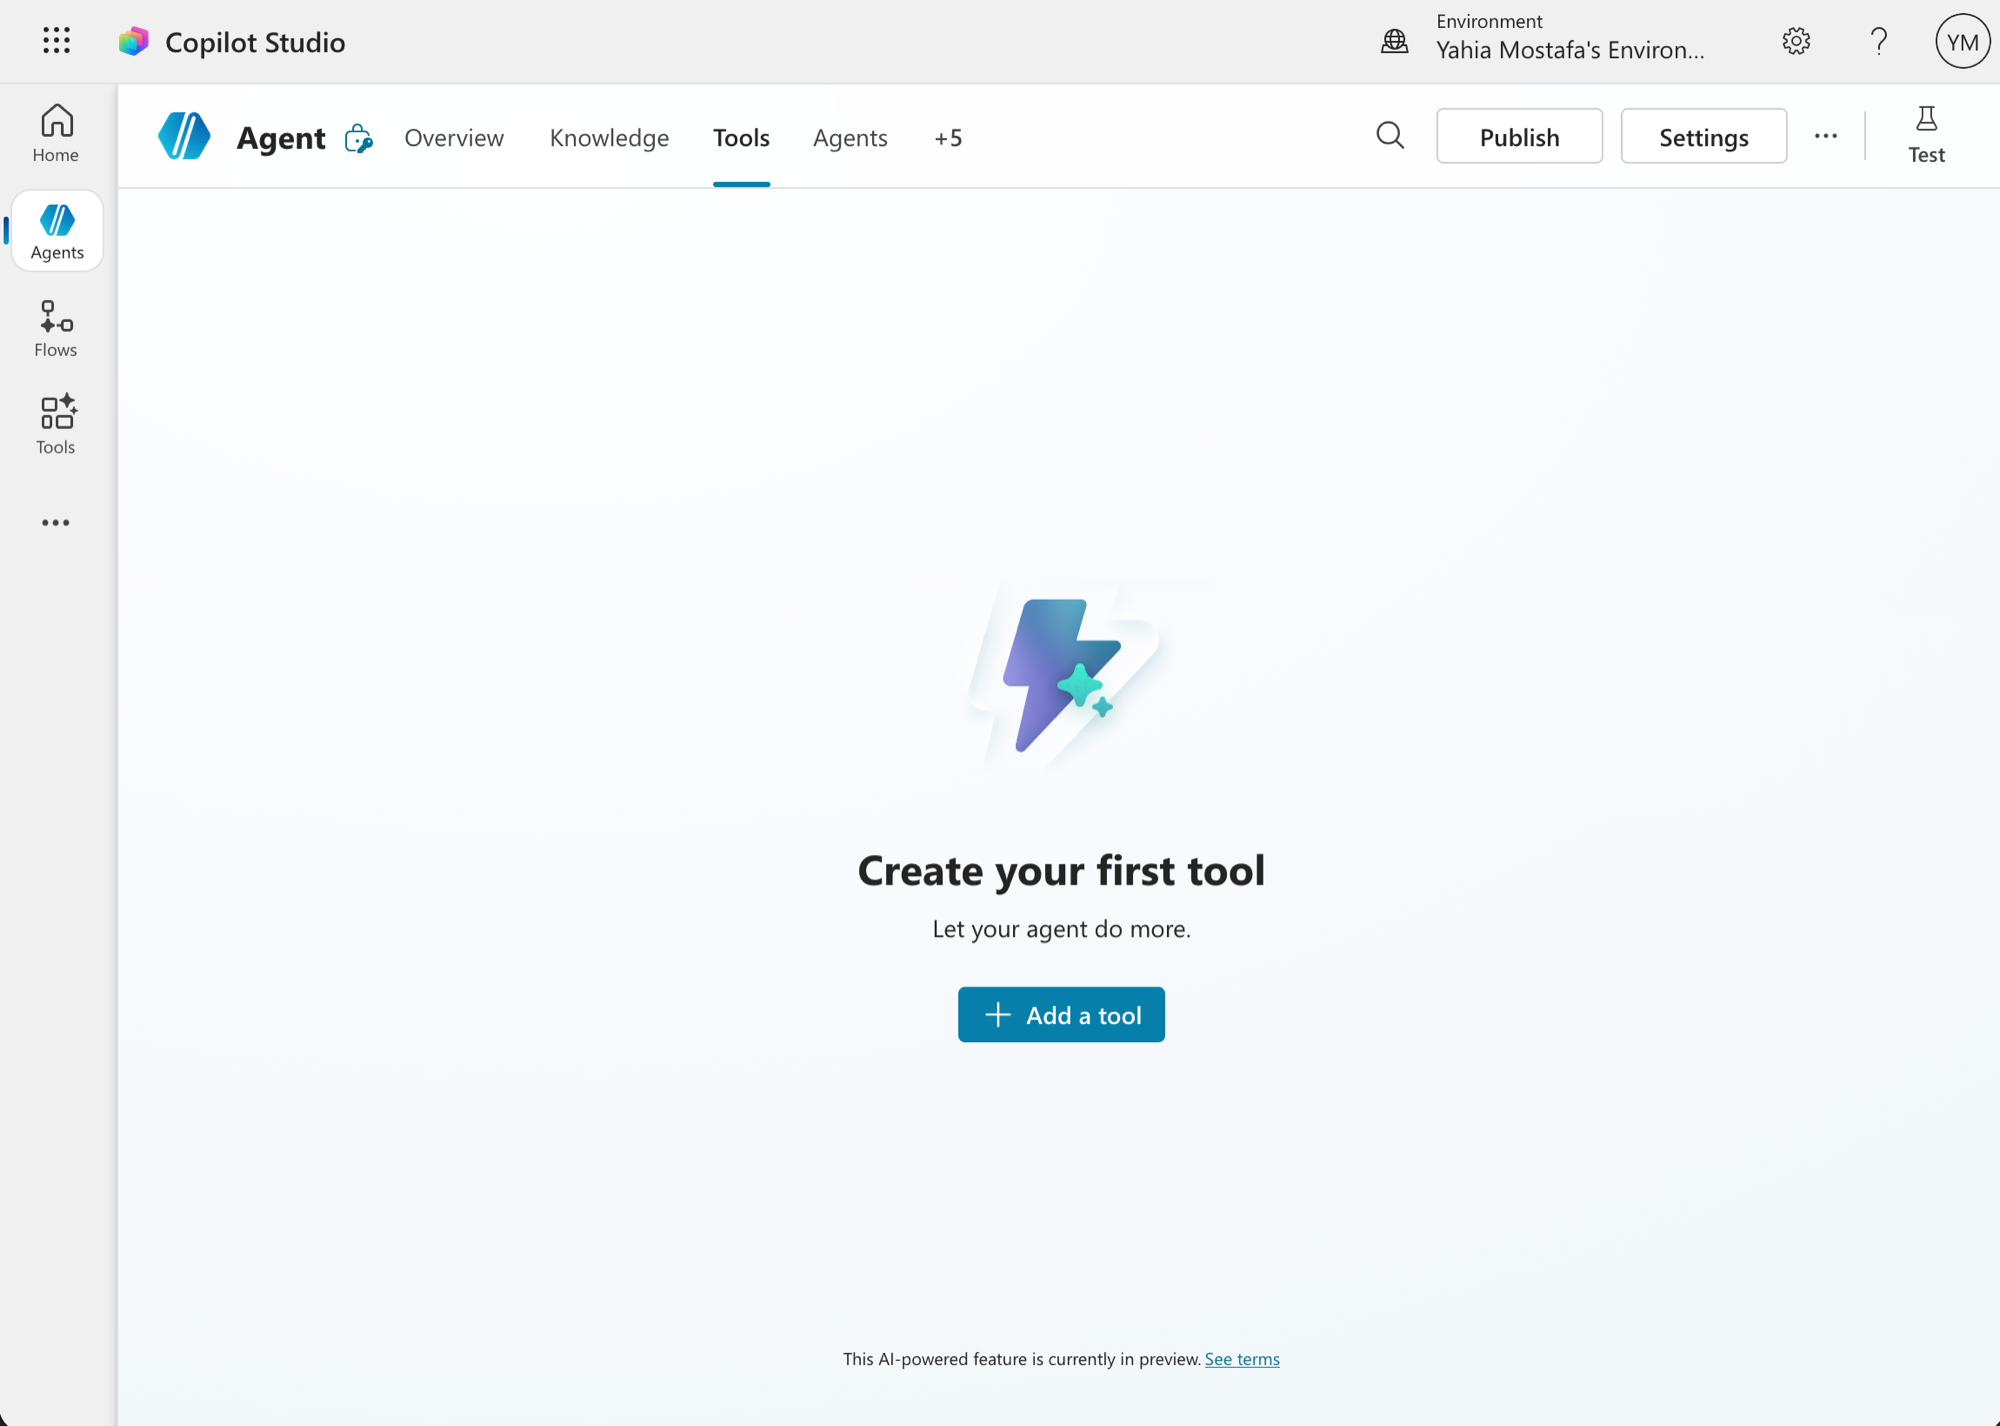
In Copilot Studio, open your agent. Under Tools, click Add a tool.
-
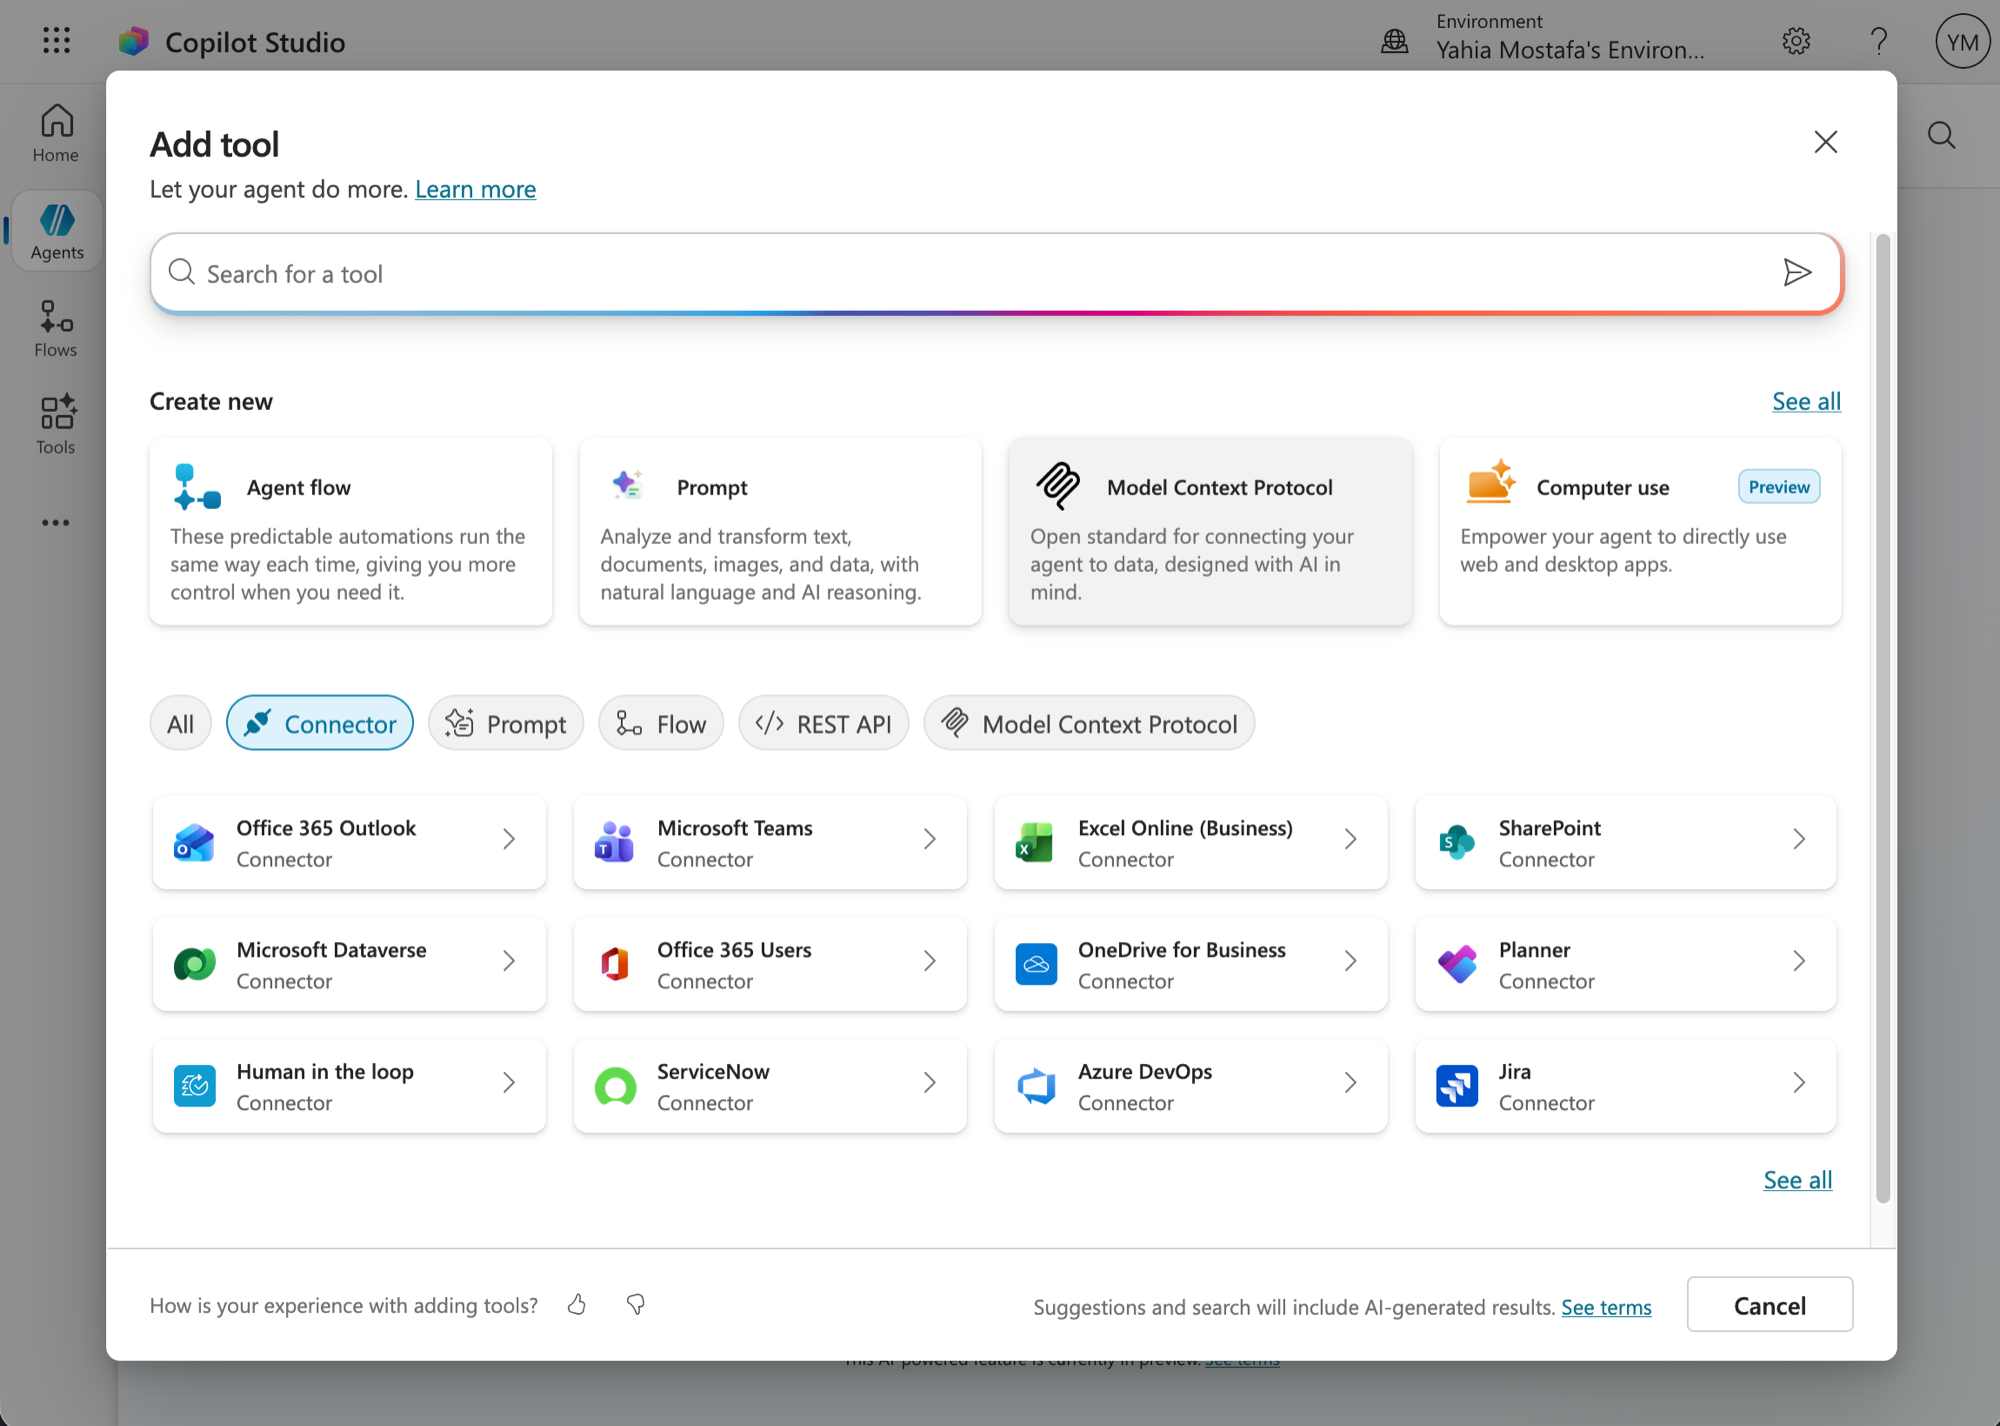
In the Add tool dialog, under Create new, click Model Context Protocol.
-
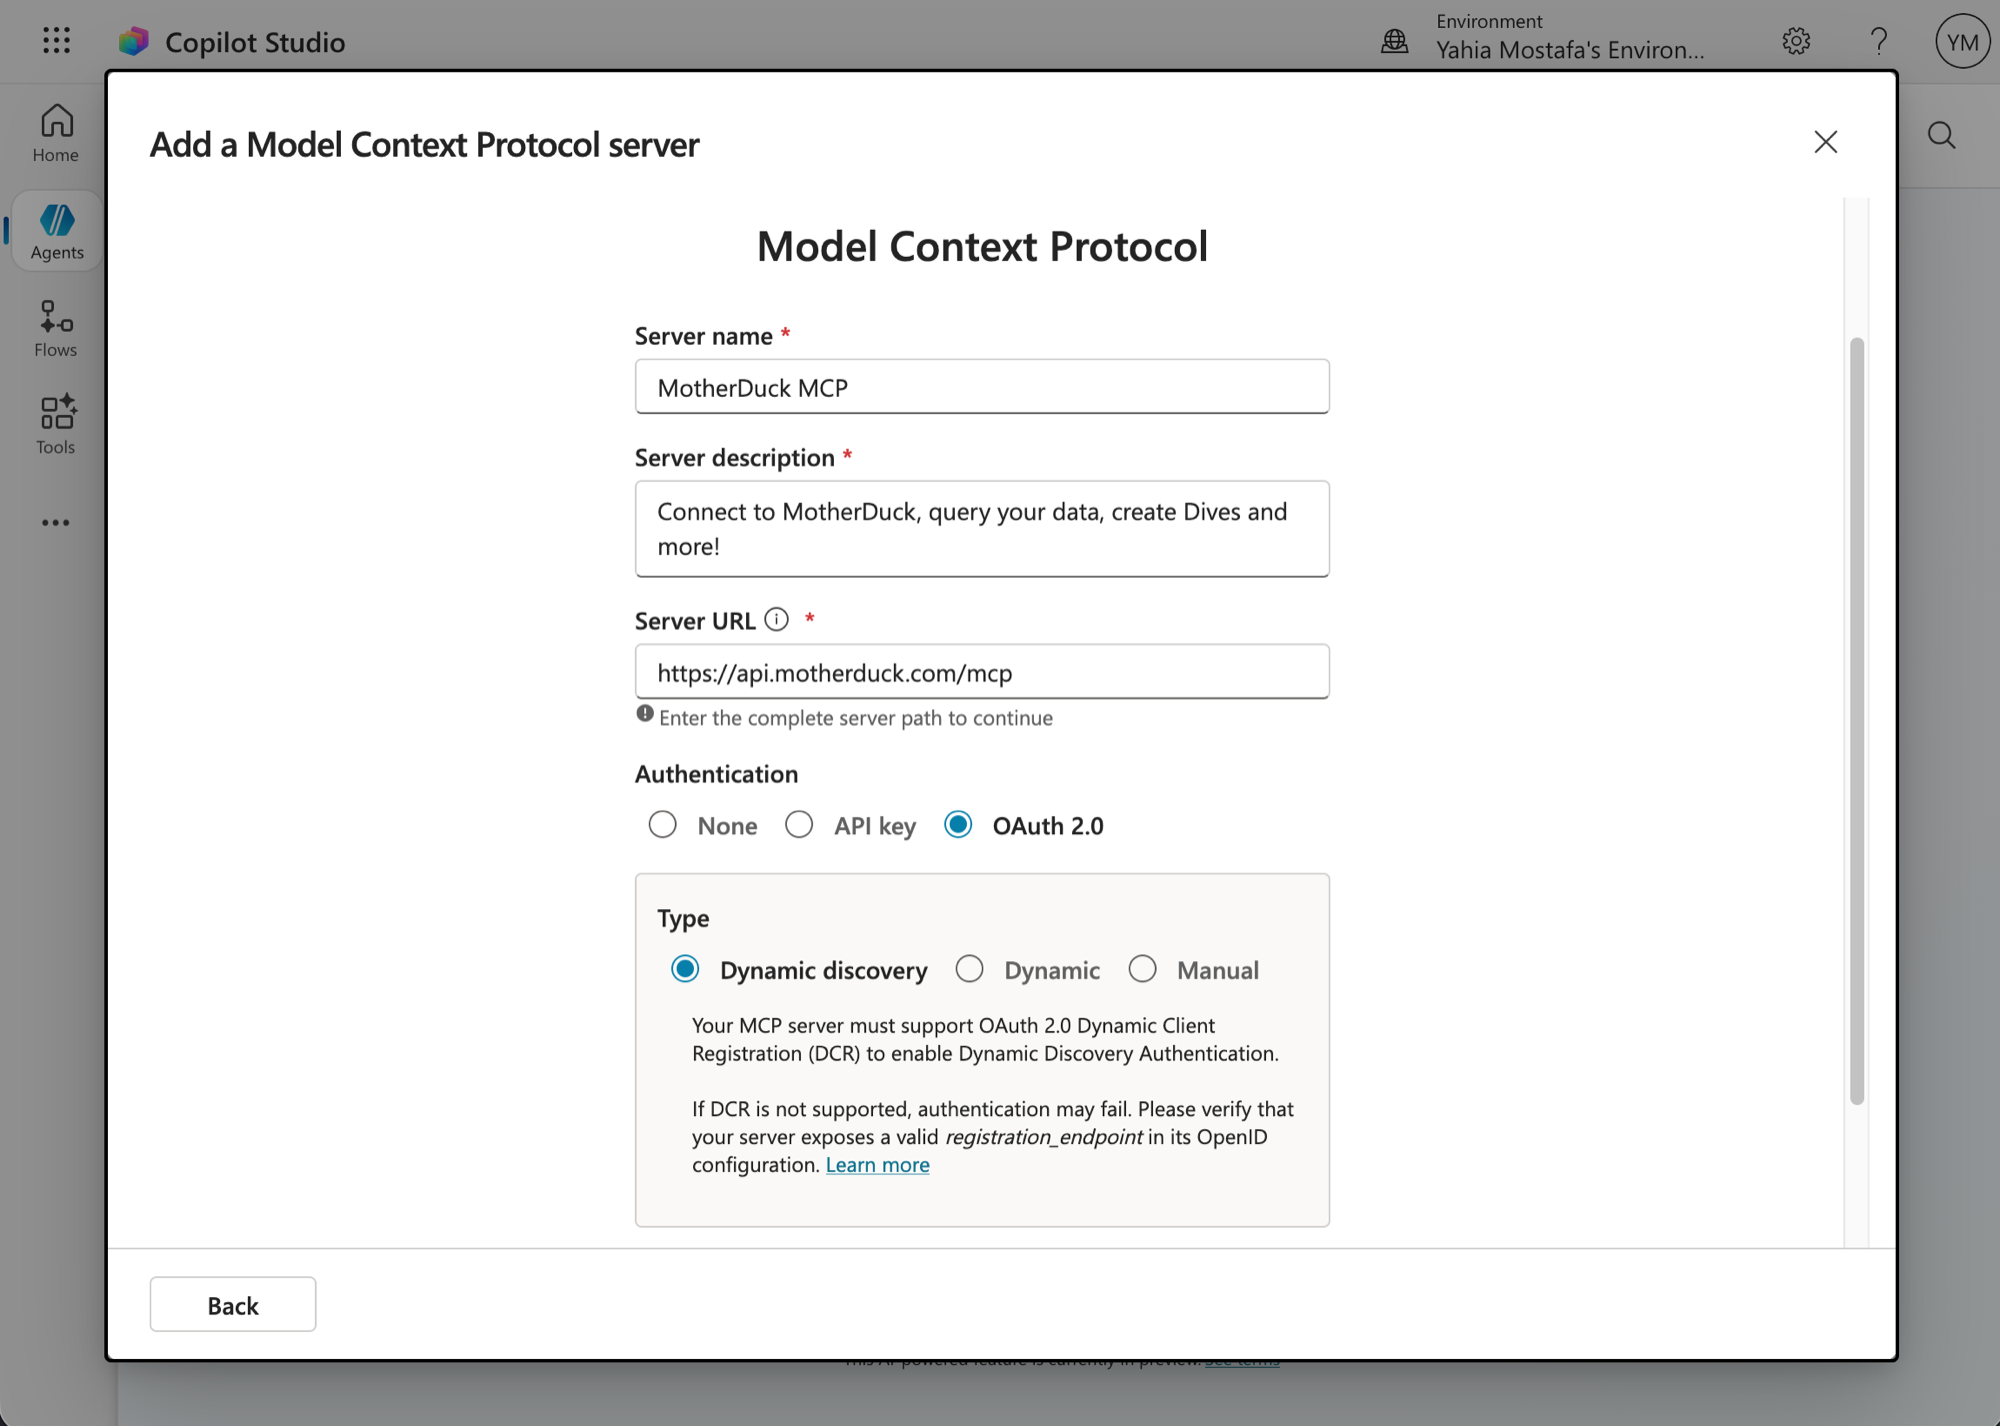
Fill in the MCP server details and pick an authentication method:
- Server name:
MotherDuck MCP - Server description:
Connect to MotherDuck, query your data, create Dives and more! - Server URL:
https://api.motherduck.com/mcp - Authentication: either
OAuth 2.0orAPI key(see below)
Option A — OAuth 2.0 (dynamic discovery). Each end user signs in to MotherDuck with their own account when they first use the agent. Select OAuth 2.0 and leave Dynamic discovery as the type, then click Create.
Option B — API key (shared service-account token). All end users share a single MotherDuck token. Useful when you don't want every user to provision a MotherDuck account, for example a Teams bot exposed to a wide audience. Select API key, set Type to
Header, enterAuthorizationas the Header name, and click Create.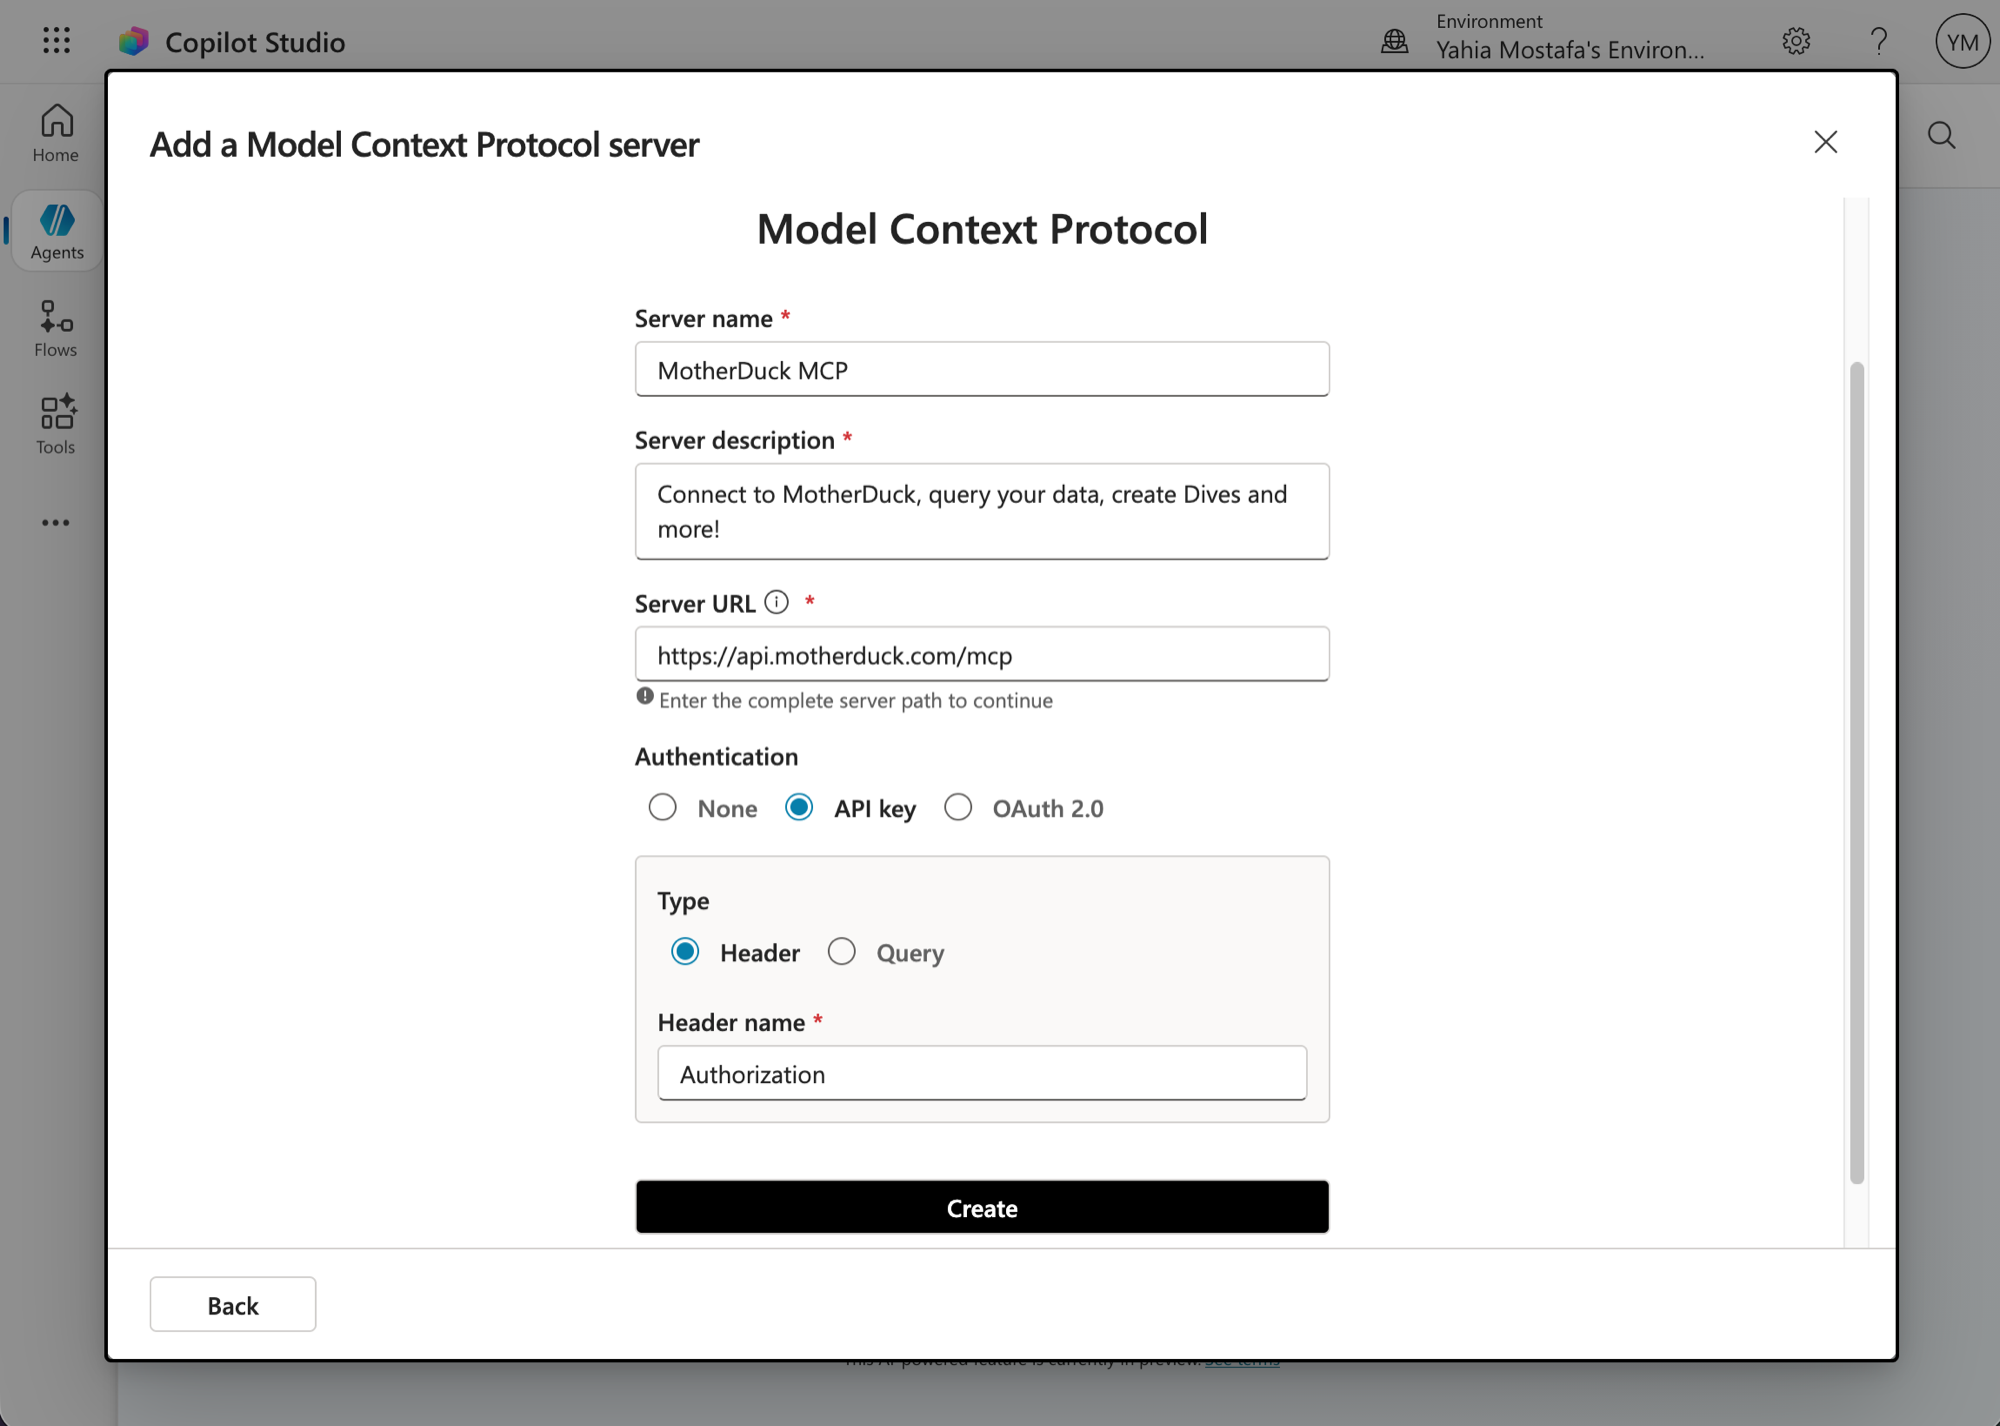 caution
Header name must be
Authorization— notBearer. TheBearerprefix belongs in the value you enter in step 5. - Server name:
-
Back in the Add tool dialog for MotherDuck MCP, open the Connection dropdown and click Create new connection.
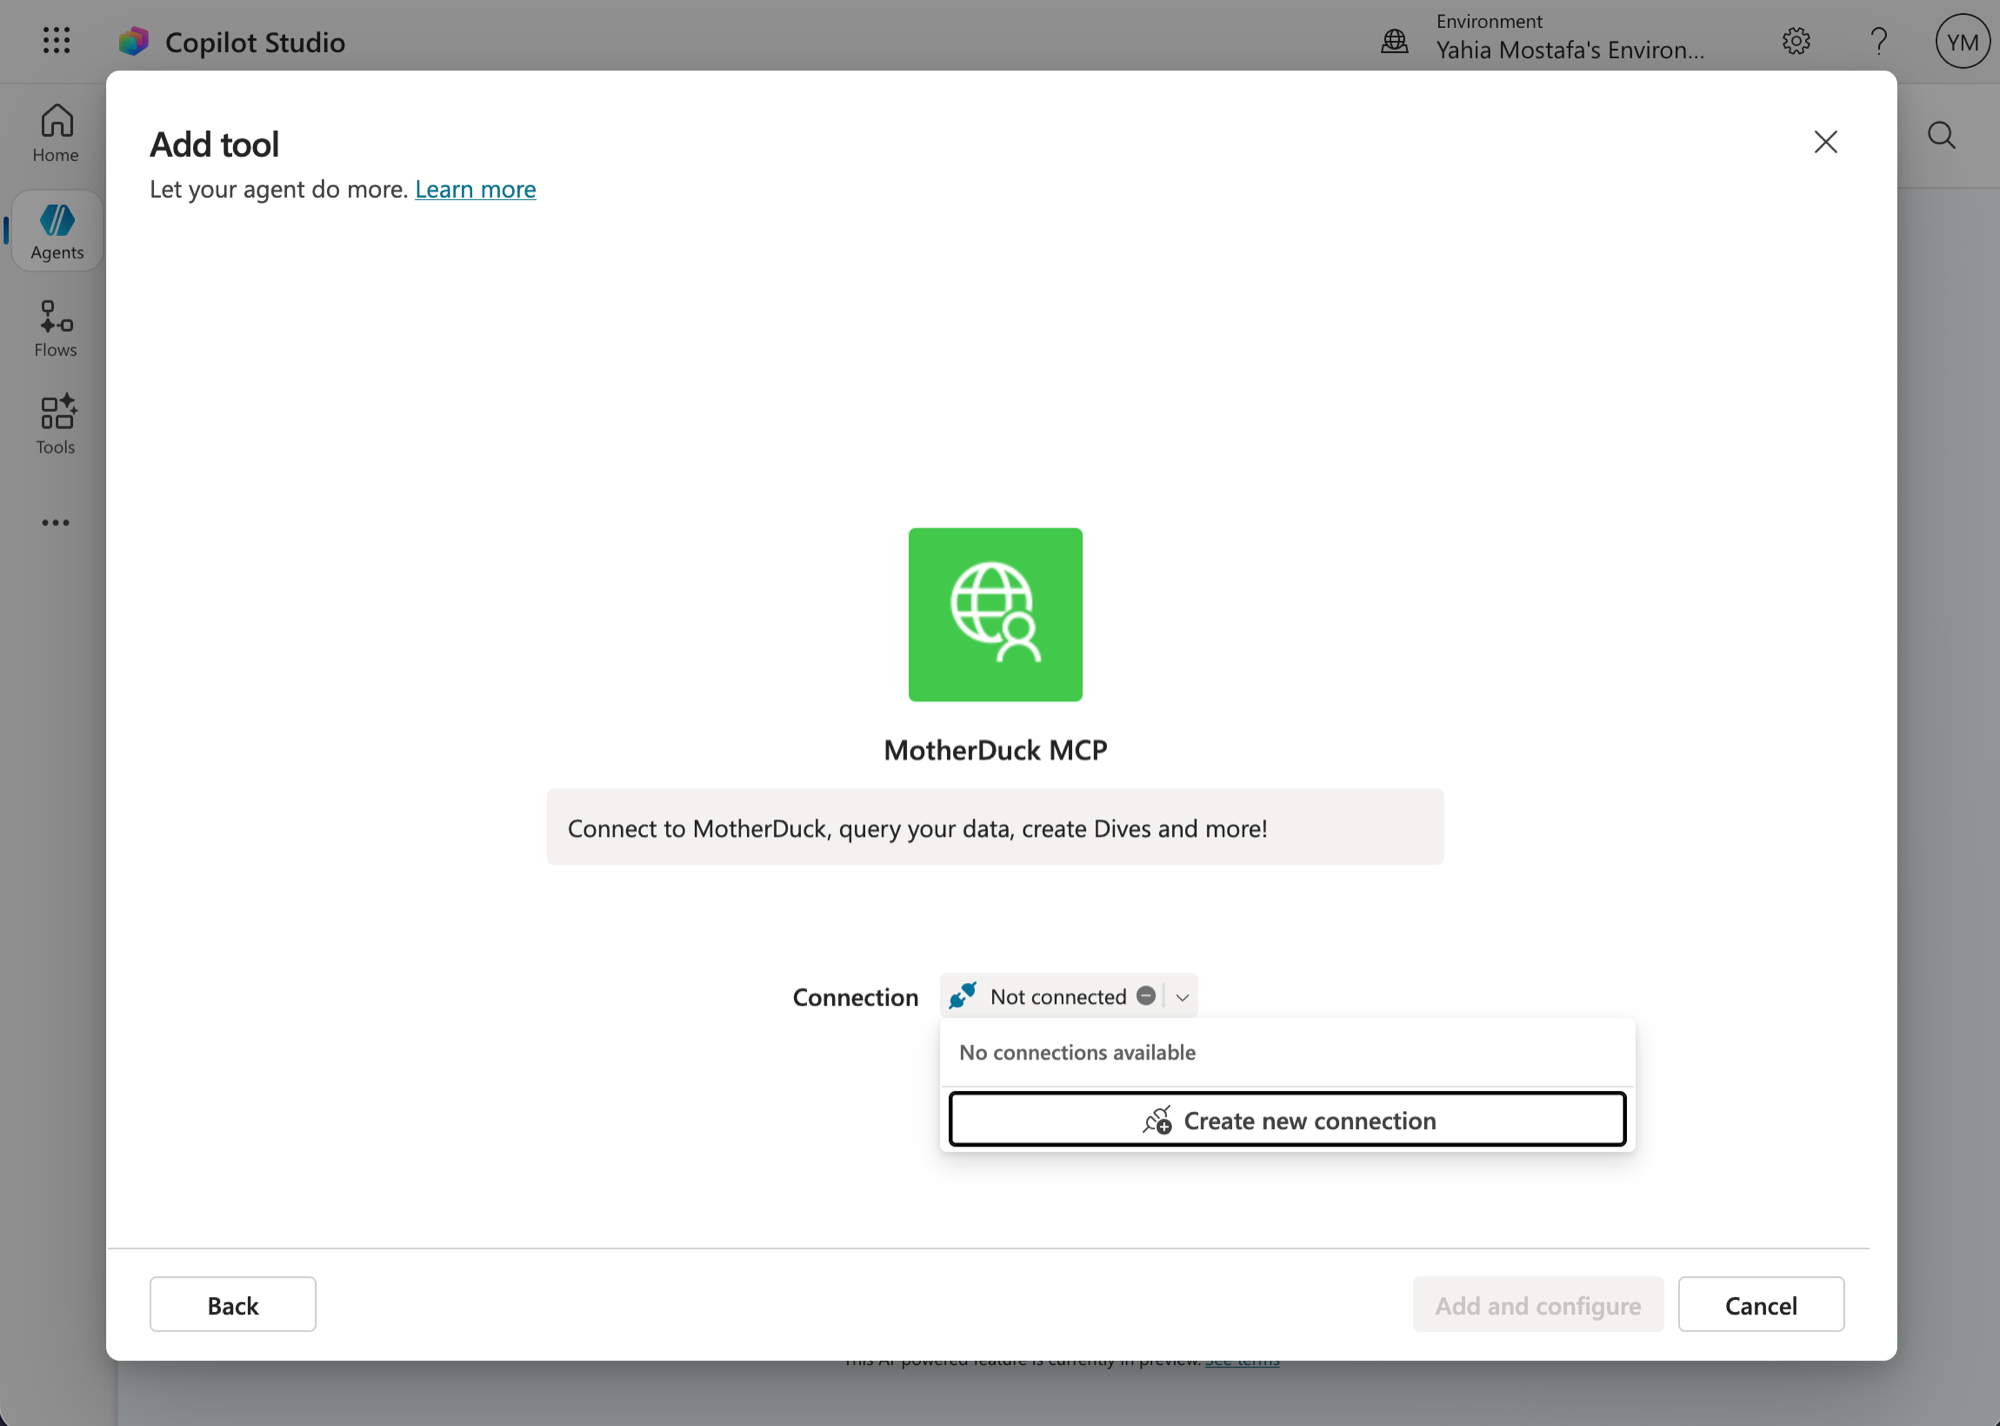
The next step depends on the authentication method you picked in step 3:
- OAuth 2.0: Copilot Studio opens a browser window that redirects to MotherDuck. The end user signs in to their MotherDuck account and approves the request. The connection is created once authentication completes — skip to step 6.
- API key: Copilot Studio shows the token entry dialog described in step 5.
-
In the Connect to MotherDuck MCP dialog, enter your MotherDuck access token prefixed with
Bearer:Bearer <your_motherduck_token>Replace
<your_motherduck_token>with an actual token from MotherDuck → Settings → Access Tokens, then click Create.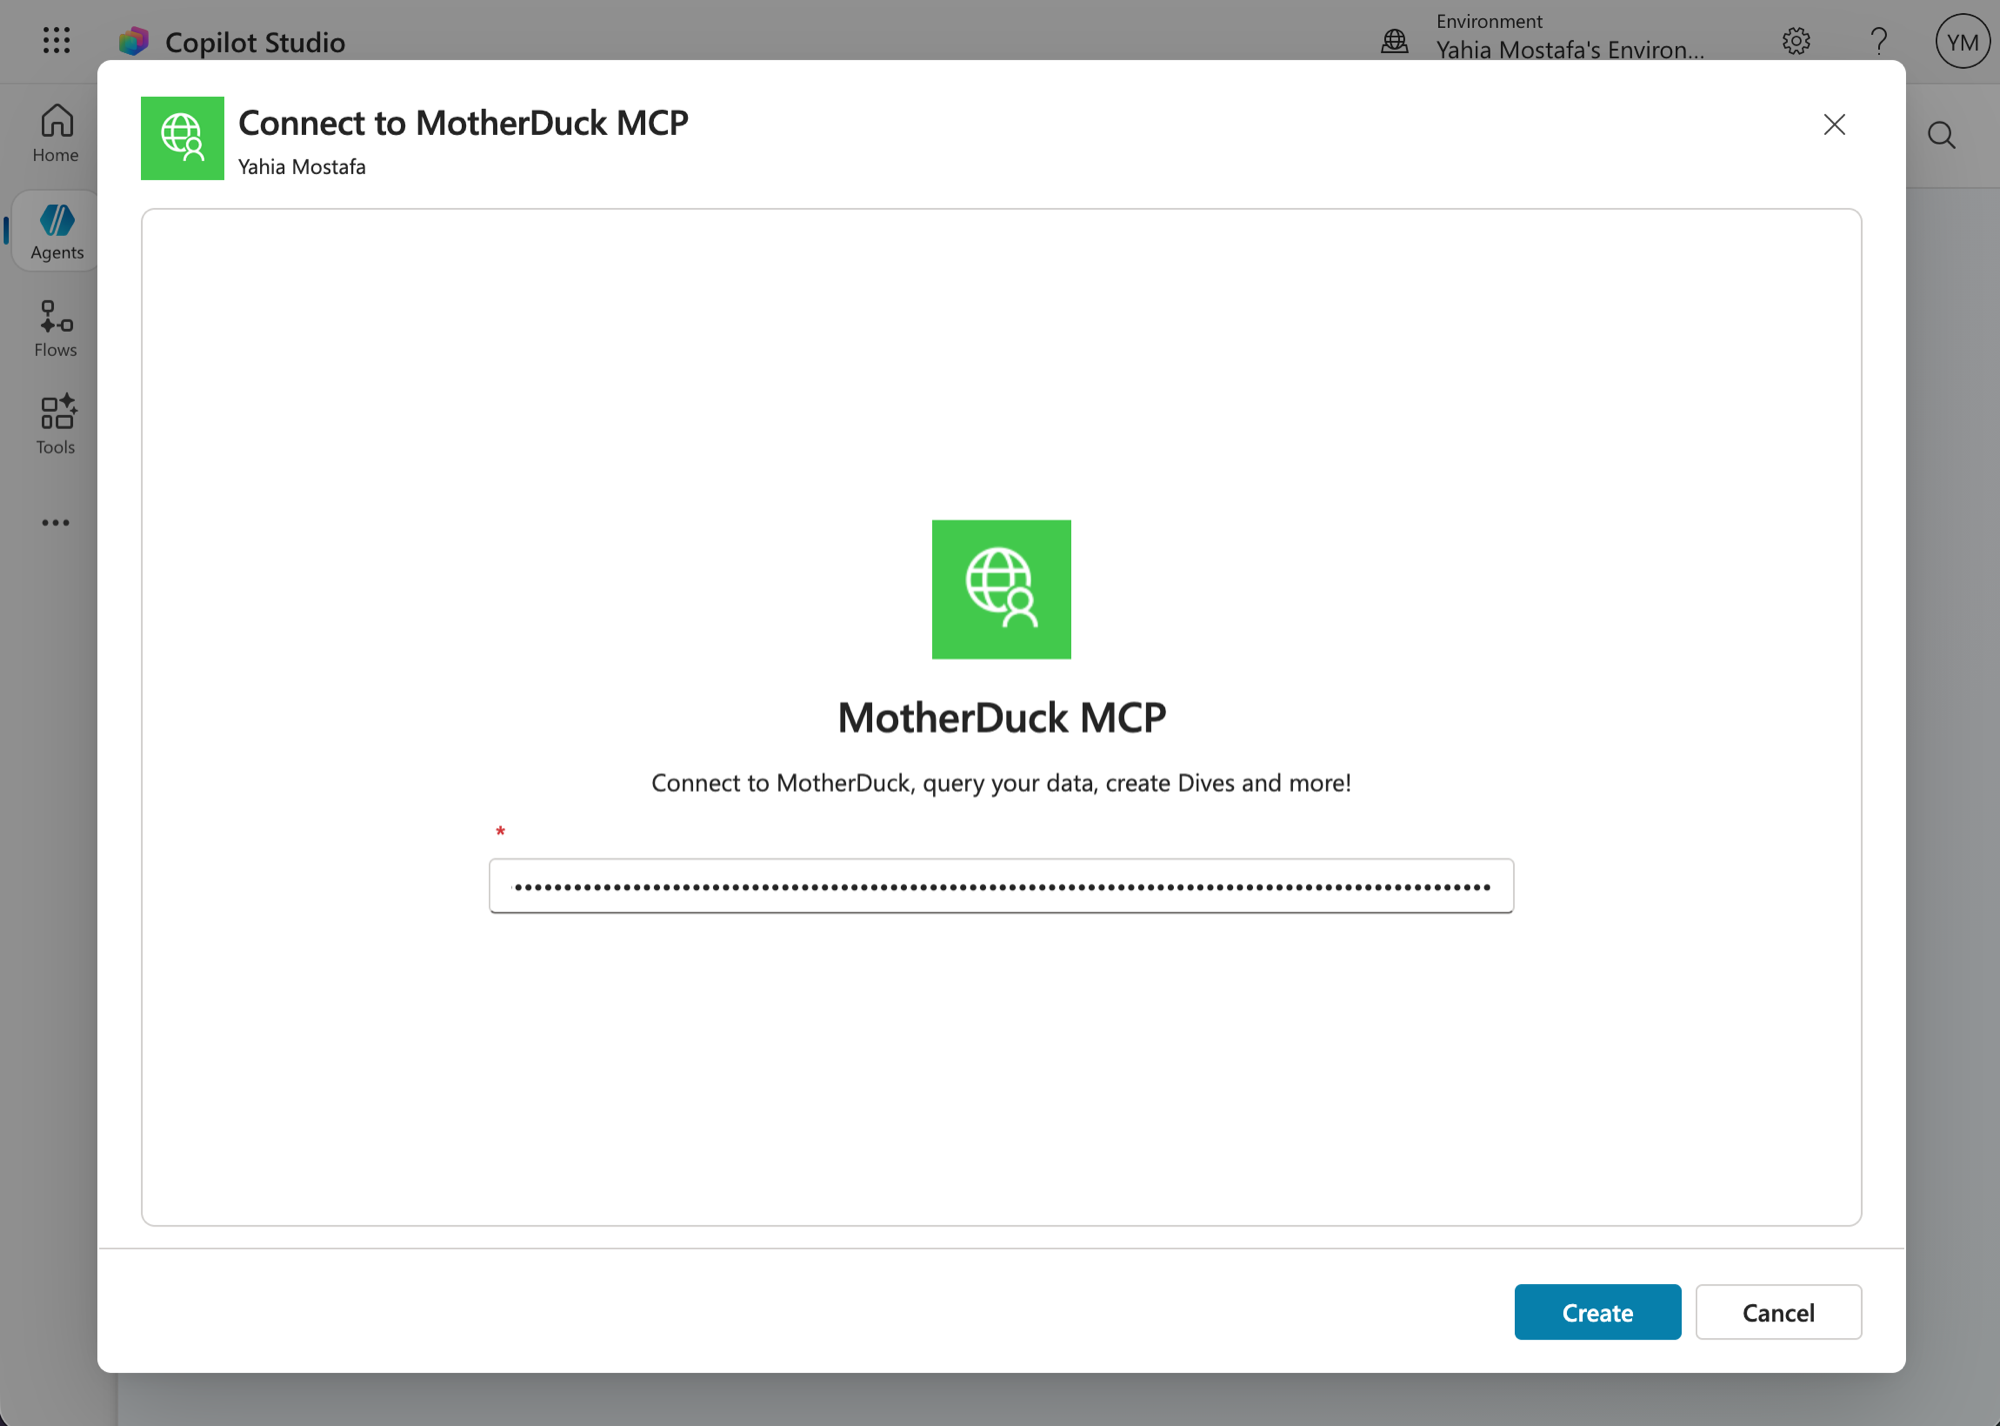 tip
If the agent is published and used by many end users, create a dedicated service account and use a read scaling token so the agent can't modify data. See Restricting to read-only access for details.
-
Once the connection shows a green check mark, click Add and configure. Copilot Studio confirms the tool was added successfully.
-
The MotherDuck MCP entry opens with the full tool list. Enable or disable tools based on what the agent should be allowed to do (for example, disable
query_rwif the agent should stay read-only), then click Save.
-
Open the agent's connection manager and click Connect on the MotherDuck MCP entry, then submit. This reuses the connection you created in step 5.
-
Switch to the Test pane and ask a question that exercises the tools, for example "What's the highest rated movie with over 10k votes in my IMDb database?". The agent calls the MotherDuck tools and responds with live data from your databases.
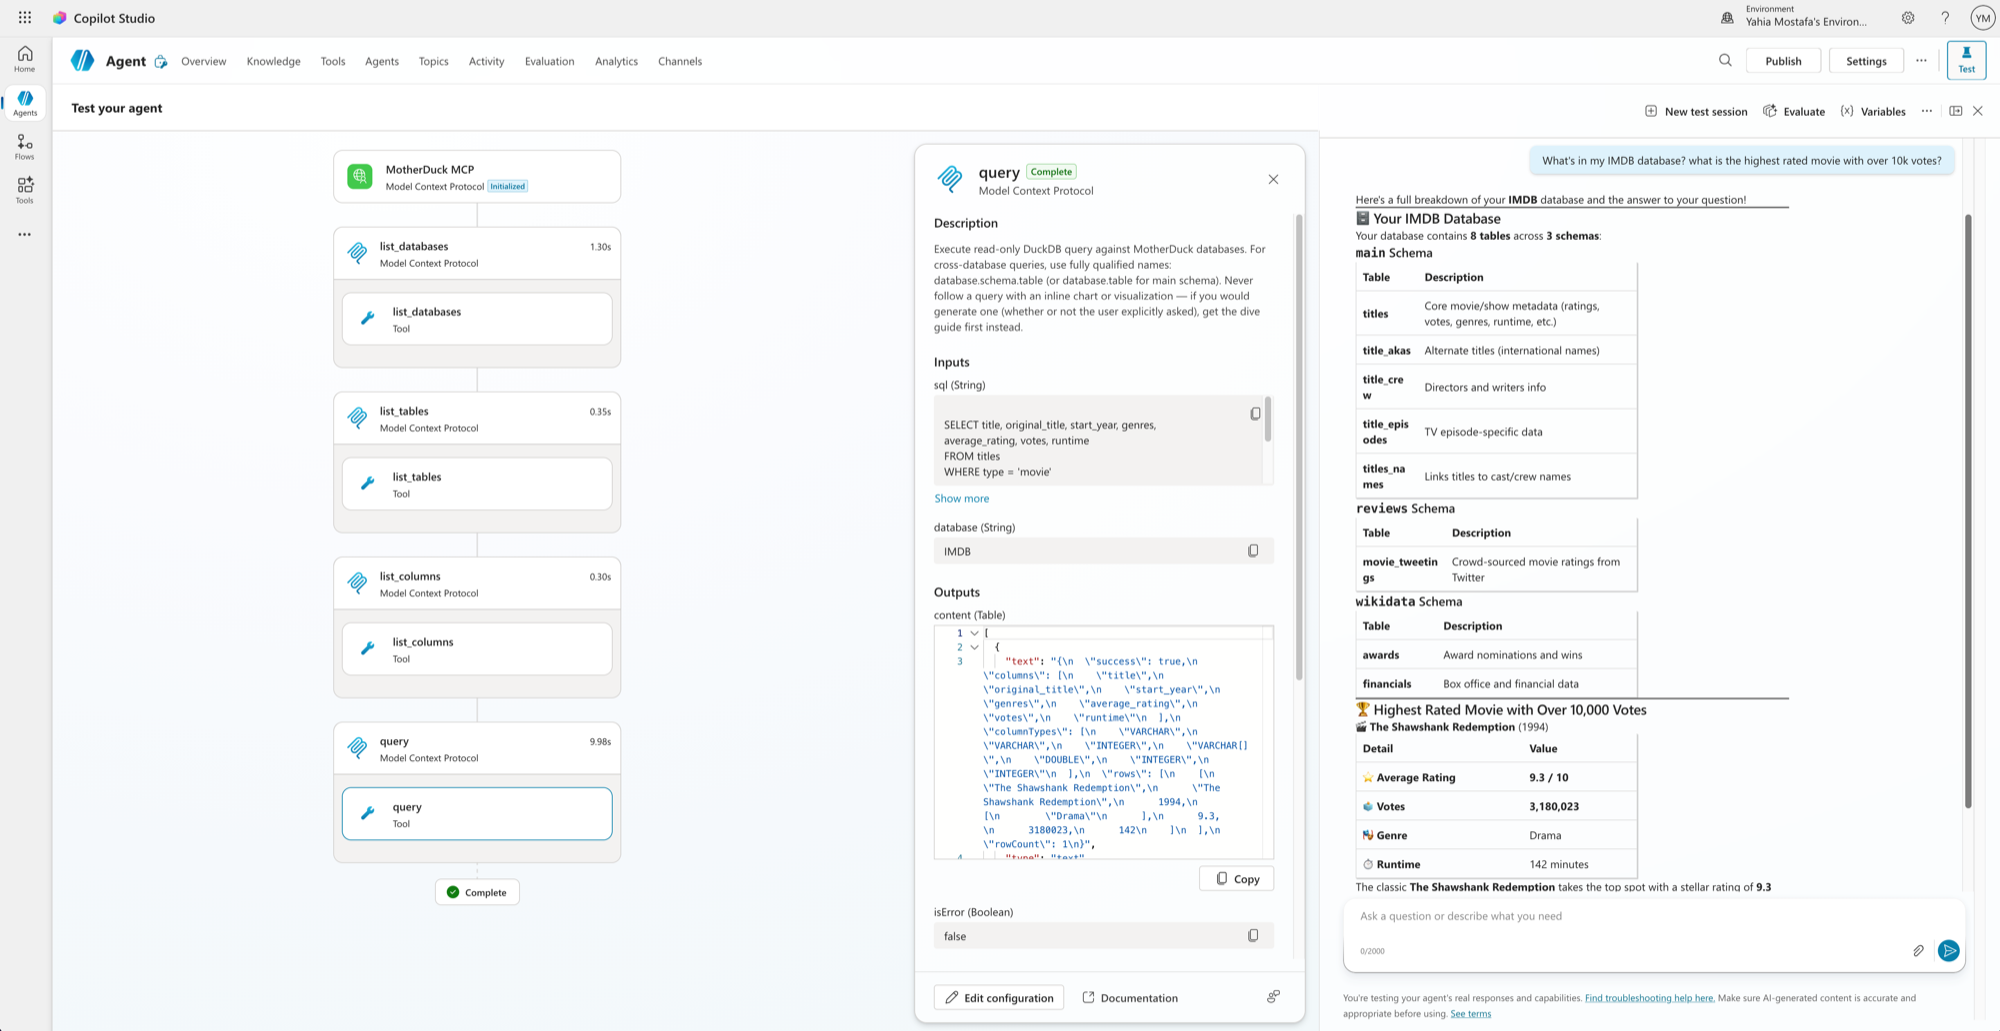
When you authenticate with an API key, all users of the Copilot Studio agent share the same MotherDuck token. Queries run by any end user are attributed to the service account that owns the token, not to the individual Microsoft 365 user. Use OAuth 2.0 if you need per-user attribution.
Alternative: Power Automate custom connector (OpenAPI)
If you'd rather wire the MotherDuck MCP server in as a Power Automate custom connector (for example, to share the connector across Copilot Studio and Power Automate flows in the same environment), you can import the following OpenAPI 2.0 spec. The x-ms-agentic-protocol: mcp-streamable-1.0 extension tells Copilot Studio to treat the connector as a streamable MCP server.
swagger: '2.0'
info:
  title: MotherDuck Remote MCP
  description: The remote MCP to connect to MotherDuck tools, docs and more
  version: 1.0.0
host: api.motherduck.com
basePath: /
schemes:
  - https
paths:
  /mcp:
    post:
      summary: MotherDuck Remote MCP
      description: The remote MCP to connect to MotherDuck tools, docs and more
      operationId: InvokeServer
      x-ms-agentic-protocol: mcp-streamable-1.0
      responses:
        '200':
          description: Immediate Response
securityDefinitions:
  api_key:
    type: apiKey
    in: header
    name: Authorization
security:
  - api_key: []
In Power Automate, go to Custom connectors → New custom connector → Import an OpenAPI file, paste the spec above, and save. When you create a connection, enter Bearer <your_motherduck_token> as the API key value — the same format as the native MCP flow described above.
If you're using Windsurf, Zed, or another MCP-compatible client, use the following JSON configuration:
{
  "mcpServers": {
    "MotherDuck": {
      "url": "https://api.motherduck.com/mcp",
      "type": "http"
    }
  }
}
The remote MCP server uses OAuth, so you sign in with your MotherDuck account during setup. To connect as a service account, or from an agent that can't complete a browser sign-in, use an access token instead. See Connect to the MCP server with an access token.
Offer an MCP connection under your own brand
If your customers should sign in to your product and access data through tenant service accounts, build a wrapper around the managed remote server. You can select tools, supply business and style guidance, capture question context, and return dashboards in your application. See White-label the MotherDuck MCP server for the architecture and implementation considerations.
Configuring tool permissions
Most MCP clients let you control how the AI uses each tool. The exact UI varies by client, but the general permission levels are:
| Permission | Behavior |
|---|---|
| Always allow | The AI uses the tool automatically without asking. Faster iteration when errors occur, but no human confirmation before each action. |
| Needs approval | The AI asks for your confirmation before each tool use. Gives you visibility into every action. |
| Blocked | The AI cannot use this tool. |
The MCP Server provides both read-only (query) and read-write (query_rw) tools. For exploratory analysis, setting read-only tools to "Always allow" enables faster back-and-forth when the AI needs to retry or refine queries. You can keep query_rw on "Needs approval" or block it if you only need read access. See Restricting to read-only access for more options.
Remote vs local MCP server
MotherDuck offers two MCP server options:
| Server | Best for | Setup | Access |
|---|---|---|---|
| Remote (hosted by MotherDuck) | Most users who query and modify data on MotherDuck cloud | Zero setup; connect through URL and OAuth | Read-write |
| Local (mcp-server-motherduck) | Self-hosted use; local DuckDB files; or when you need full customization | Install and run the server yourself | Fully customizable |
The remote server is recommended for most use cases. Use the local server when you need to work with local DuckDB files, want custom tool configurations, or require full control over the server environment.
Local MCP Server GitHub Repository – Self-host the open-source MCP server for DuckDB and MotherDuck
Where to go from here
- AI Data Analysis Getting Started: 5-minute walkthrough of querying data and creating Dives
- MCP Workflows Guide: Best practices for getting accurate results from AI-powered analysis
- MCP Server Reference: Server capabilities, available tools, and regional availability
- Connect with an access token: Authenticate as a service account or from clients that can't use OAuth
- Restricting to Read-Only Access: Restrict your AI assistant to read-only queries
- Work with agents through the CLI: When to reach for the MotherDuck CLI instead of MCP, and why it costs fewer tokens