2024/01/30 - Ryan Boyd
This Month in the DuckDB Ecosystem: January 2024
DuckDB news: Query Google Sheets with one line of SQL. Join across PostgreSQL, SQLite, and MySQL databases. ERPL extension connects SAP data. Harlequin terminal IDE launches.
- 13 min read
BY- 13 min read
BYIn the Python realm, we have many library options for data pipelines. Pandas has been there for a while, and many projects have popped up. Pyspark, Dask, and Polars lately, to just name a few.
The acronym "DB" in DuckDB can be confusing. Why would I need a database within my Python data pipeline workflows? While I already wrote a preamble about this, comparing other available data frame libraries, in this blog, we'll go through an end-to-end data project using DuckDB. We will look at how a Python library is used (using PyPi data), process this data, and then put together a nice-looking dashboard online.
This blog is part of a series and goes beyond the hello world. I'll share all my best practices for developing robust Python data pipelines! The first part will focus on architecture and the ingestion pipeline. You can find all code sources on GitHub.
And if you prefer video content, the series is also available on our YouTube channel.
Let’s first talk about the architecture.
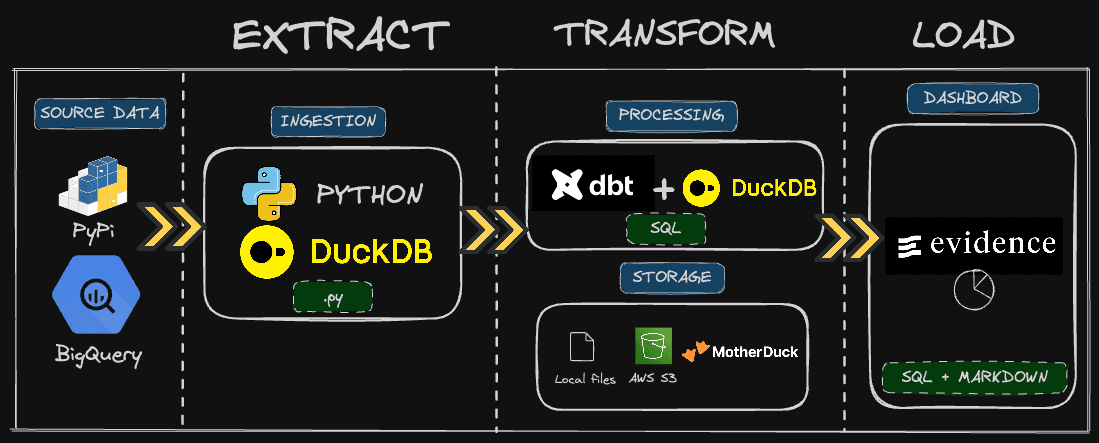
PyPi is where we need to get the data from. It is the repository where all Python libraries live, and we can get a lot of statistics regarding each one of these.
It is helpful if you want to monitor the adoption of your Python project or understand how people are using it. For example, do you have more Linux users or Windows users? Which Python version are they using?
For the past few years, the PyPI team has made the logs data available directly in Google BigQuery. We can, therefore, get the raw data directly from there. The challenge is that the relevant table is huge: 250+ TB. We’ll fetch only the relevant data for us, meaning on specific Python packages and timestamps using Python and DuckDB.
Then, we will transform that data into a relevant table that contains all the metrics we need for our dashboard. As we have only one source table, modeling will be pretty simple, and we will have one table to feed our dashboard. This will be done using pure SQL, dbt and DuckDB.
Finally, we will use Evidence, a BI-as-code tool, to create our dashboard using SQL and Markdown.
The fun thing with this stack is that you can run everything locally, a modern data stack in the box... or in the pond. However, in real-world applications, you want a remote storage for sharing and access controls.
I’ll give you two options, either AWS S3 or MotherDuck. The latter is a must-have, at least for the dashboarding part, if you want to publish online. BI tools often (always?) rely on a query engine to fetch the data.
For the ingestion pipeline, we would need :
You can git clone the project here. There's a devcontainer definition within the repository if you are using VSCode, which makes it handy and easy to have your full development environment ready.
Before getting into any Python code, I recommend heading to the Google Cloud console and playing with the source data.
To find the relevant table in Google BigQuery, search for the table file_downloads and make sure to click SEARCH ALL PROJECTS so that the search goes through public datasets.
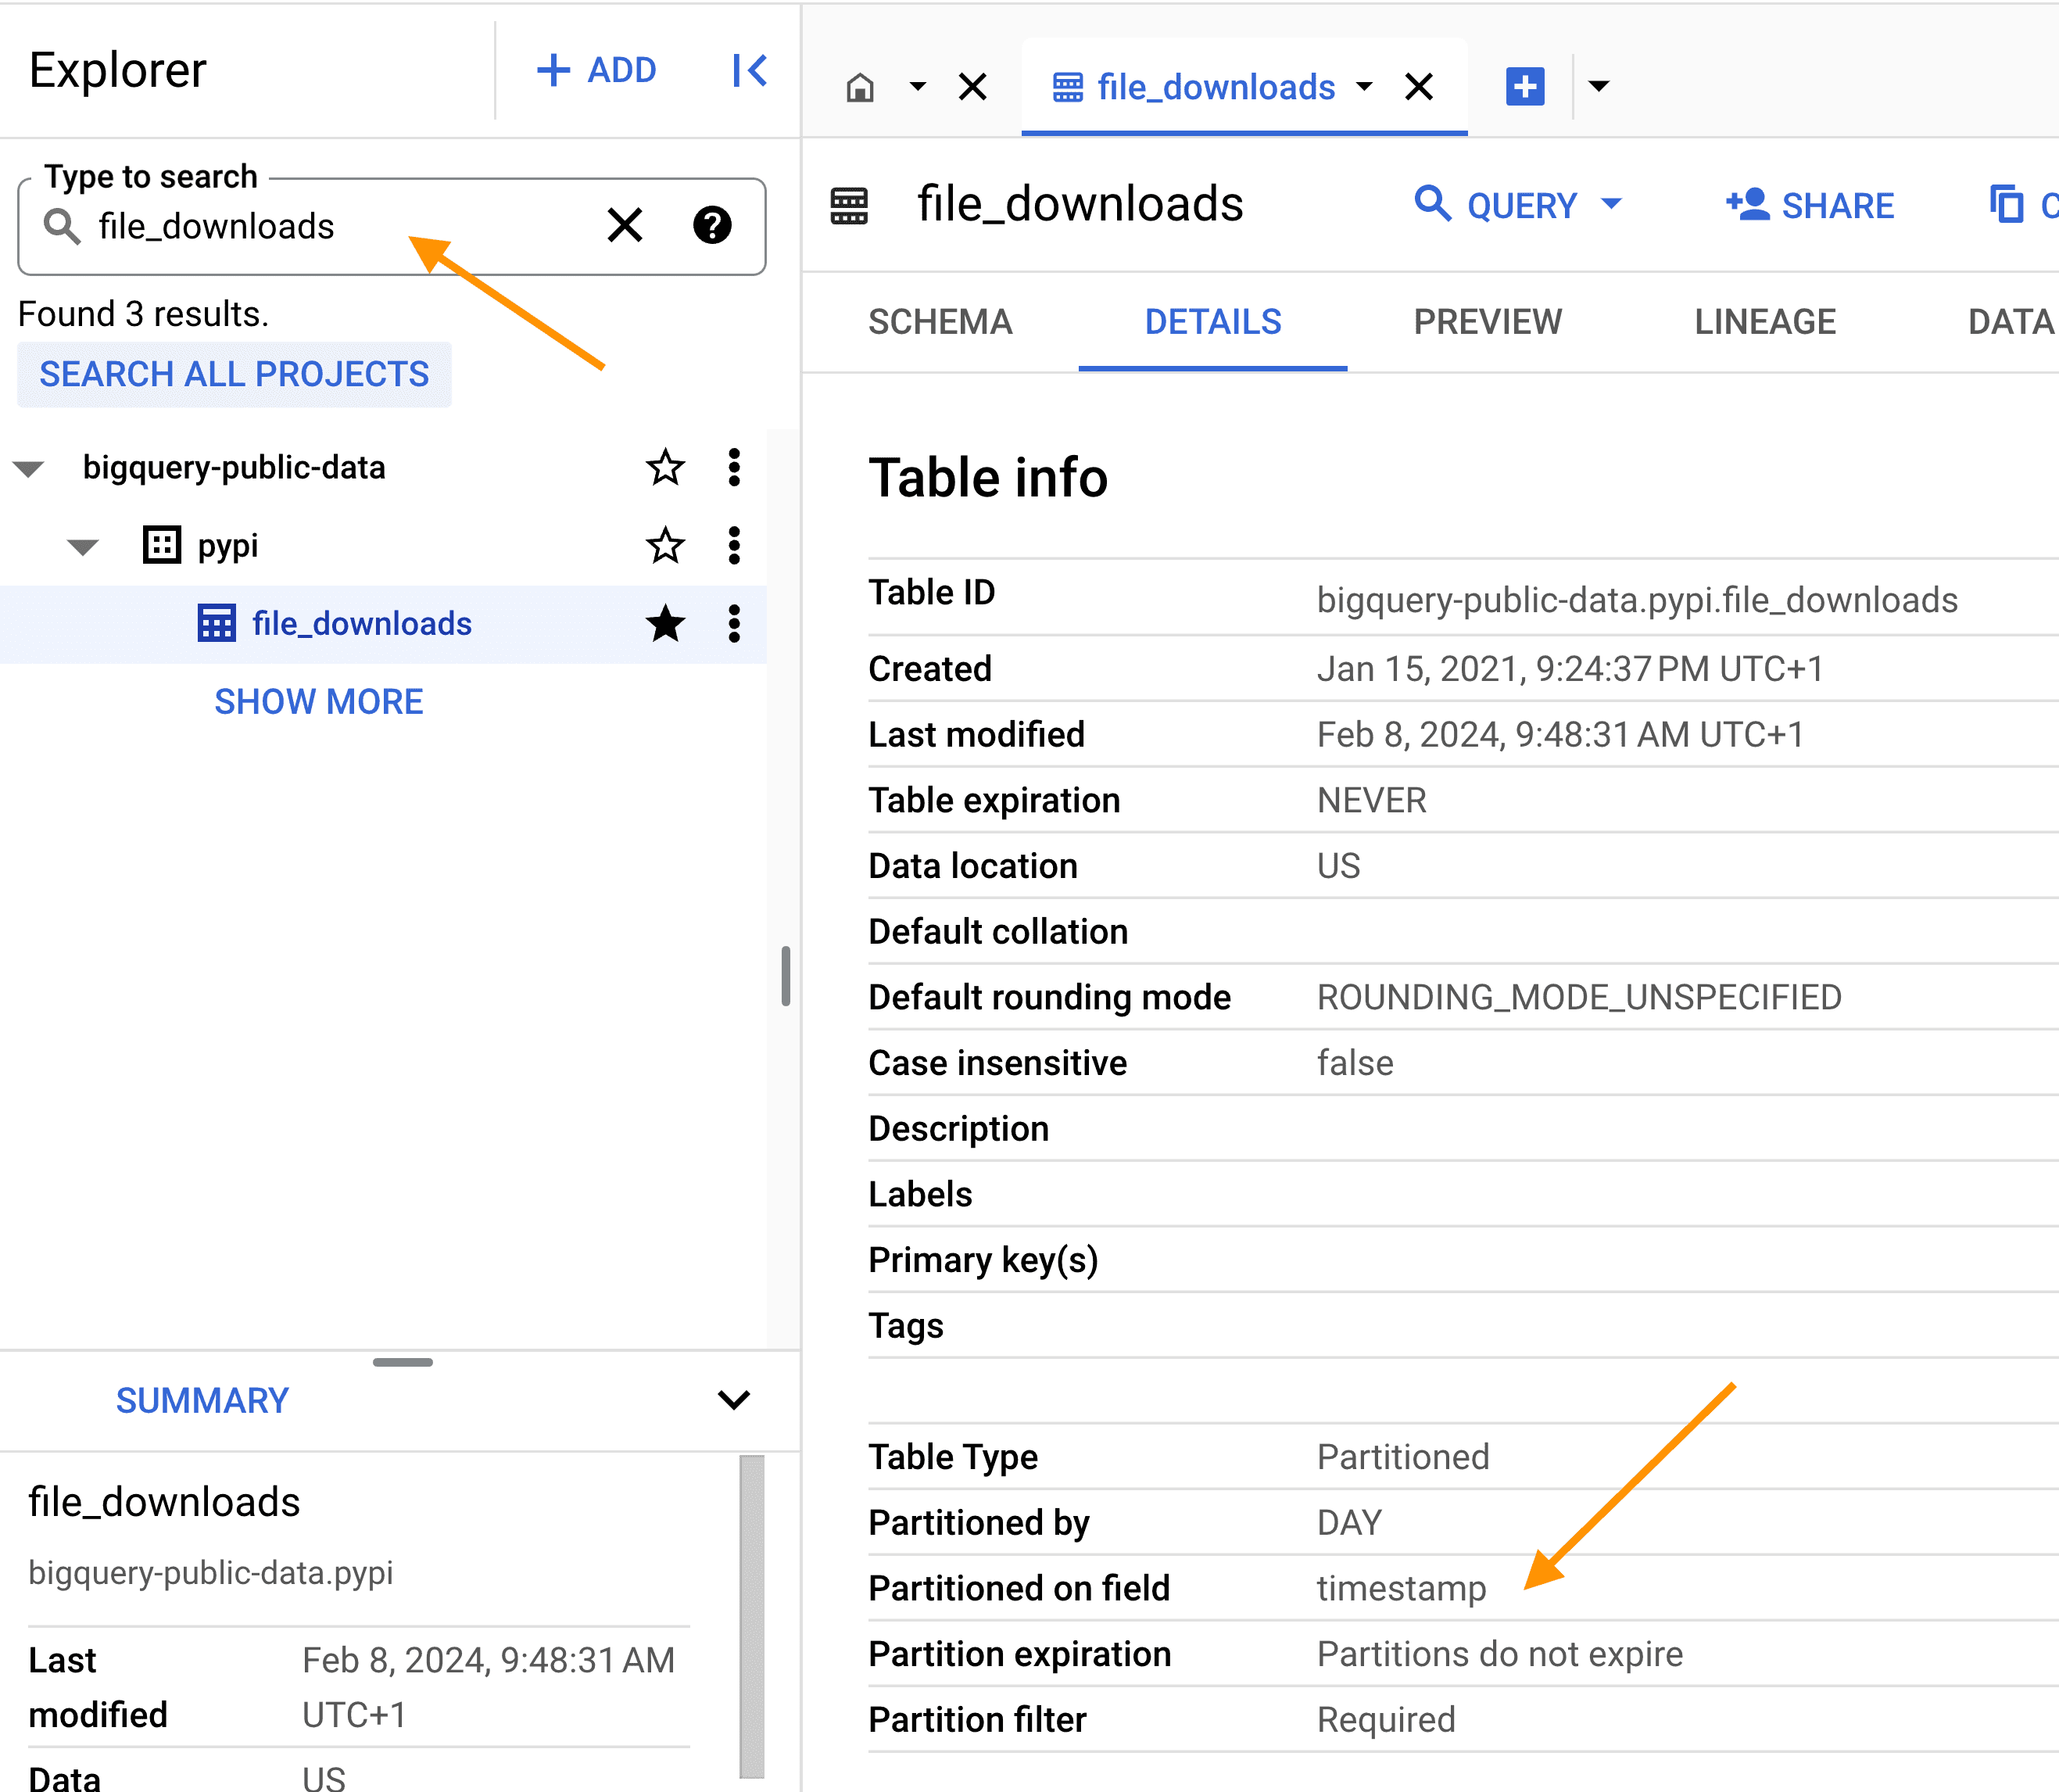 Be aware! As the table is big, ALWAYS use the partition column
 timestamp and filter on the project name; this will drastically reduce the data size of the query, and your compute bill. If you respect this, you'll probably stay in the free tier plan, which is, as of today, 1 TB of data query processing per month.
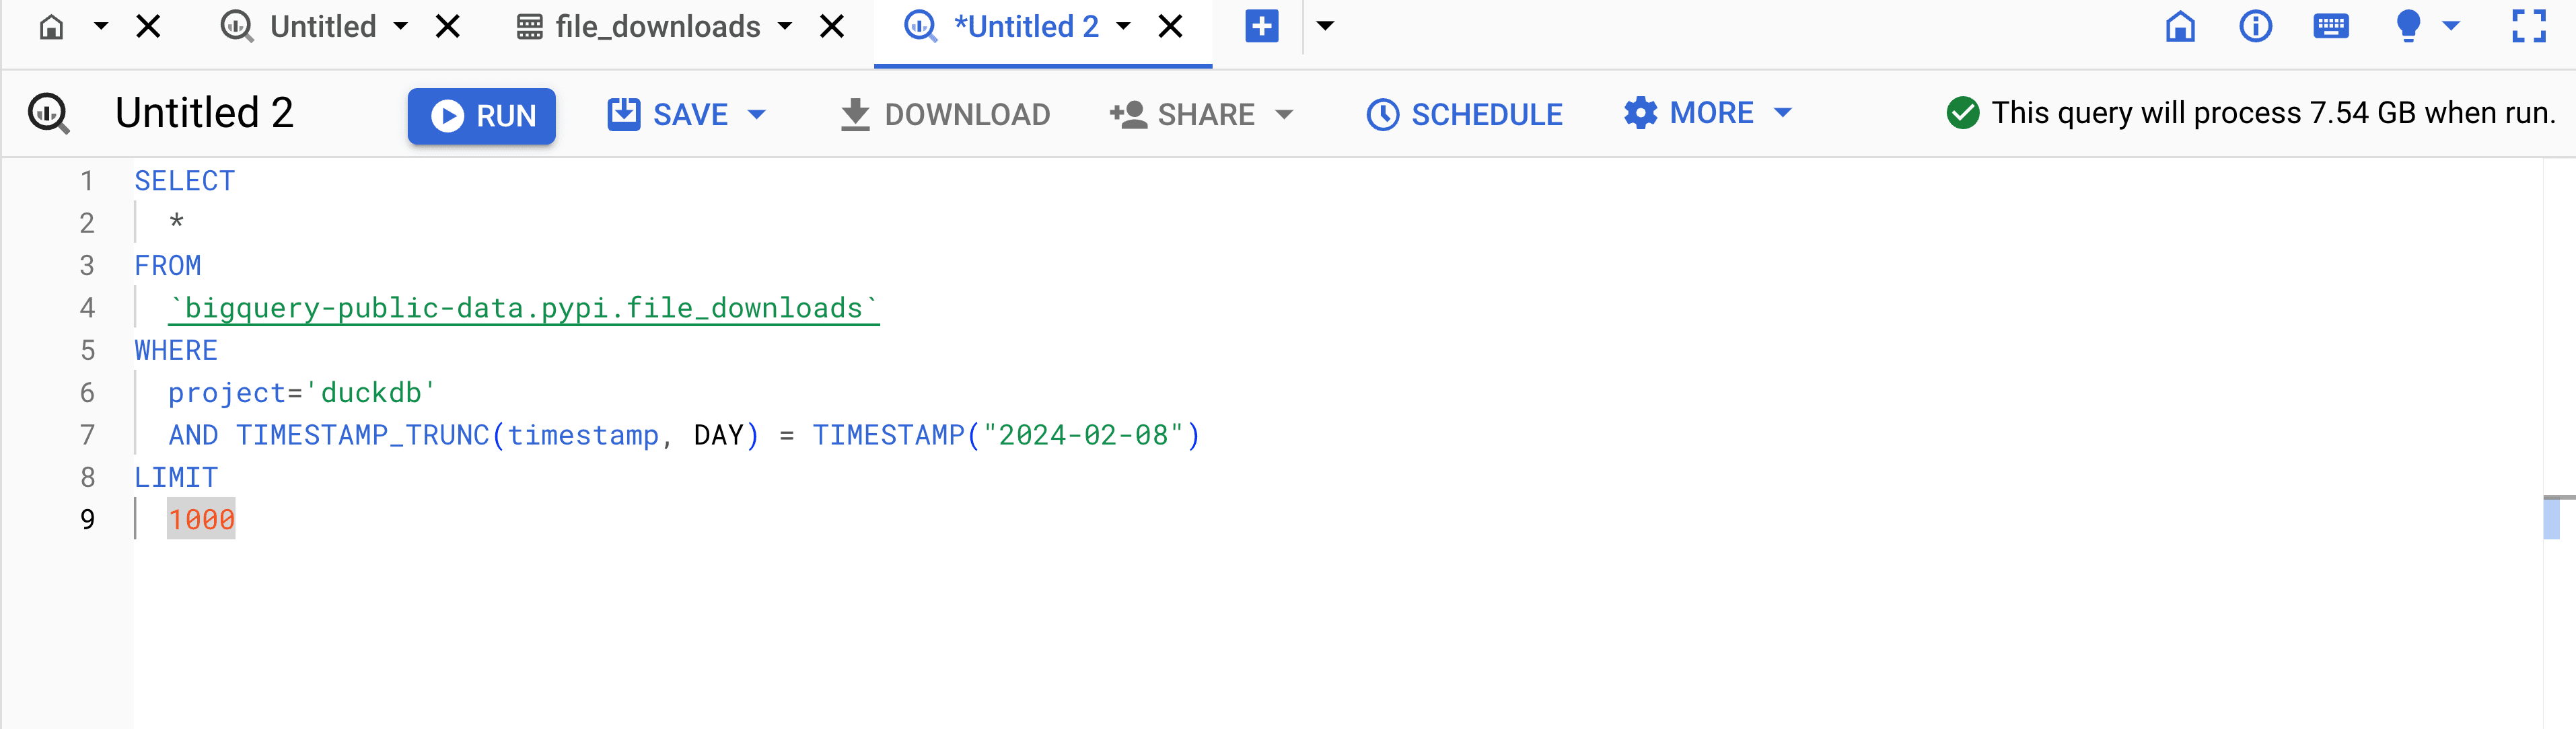 Note that while the processing will scan a significant volume of data (here's 7.54 GB), the final dataset for that specific query, for instance, will be below 1 KB. Therefore, fetching first the raw data to do all post-processing separetly will speed up things and reduce pipeline costs.
Now that we know what our query will look like, let's go through our Python project.
The full repository doesn't contain many files, in the ingestion folder, we have the following four .py files
Copy code ├── bigquery.py
 ├── duck.py
 ├── models.py
 └── pipeline.py
A common practice when developing a pipeline is to create a simple CLI with some parameters. We want to be able to easily tweak how our pipeline is being run without changing any hardcoding value in the codebase. For this purpose, we will use a combination of :
To run the pipeline, we only need to run make pypi-ingest. Let's see how it works behind the scense in our Makefile
Copy code
include .env
export
.PHONY : help pypi-ingest
pypi-ingest:
poetry run python3 -m ingestion.pipeline \
--start_date $$START_DATE \
--end_date $$END_DATE \
--pypi_project $$PYPI_PROJECT \
--table_name $$TABLE_NAME \
--s3_path $$S3_PATH \
--aws_profile $$AWS_PROFILE \
--gcp_project $$GCP_PROJECT \
--timestamp_column $$TIMESTAMP_COLUMN \
--destination $$DESTINATION
The first two lines are reading a .env file and populating as environment variables
Next, we run the ingestion.pipeline module with a couple of parameters. In our pipeline.py file, we have two interesting things.
Copy code
def main(params: PypiJobParameters):
[...]
if __name__ == "__main__":
fire.Fire(lambda **kwargs: main(PypiJobParameters(**kwargs)))
First, a main() function takes a Pydantic model, which defines all the parameters expected to run our pipeline.
In this main() function, we have all the main steps of our pipelines.
The model definition of PypiJobParameters is available in the models.py.
Copy code
class PypiJobParameters(BaseModel):
start_date: str = "2019-04-01"
end_date: str = "2023-11-30"
pypi_project: str = "duckdb"
table_name: str
gcp_project: str
timestamp_column: str = "timestamp"
destination: Annotated[
Union[List[str], str], Field(default=["local"])
] # local, s3, md
s3_path: Optional[str]
aws_profile: Optional[str]
Coming back at the end of our pipeline.py we have this magic line using Fire :
Copy code
fire.Fire(lambda **kwargs: main(PypiJobParameters(**kwargs)))
The beauty of this is that Fire will automatically parse any CLI parameters (with --) and see if they match the expected PypiJobParameters model.
The bigquery.py file is pretty straightforward; we have a function to create a client to connect to BigQuery, another to generate the SQL query, and a function to run this one and fetch the data.
As we build our Pydantic model for our job parameters, we pass this through the function to generate the SQL query.
Copy code
def build_pypi_query(
params: PypiJobParameters, pypi_public_dataset: str = PYPI_PUBLIC_DATASET
) -> str:
# Query the public PyPI dataset from BigQuery
# /!\ This is a large dataset, filter accordingly /!\
return f"""
SELECT *
FROM
`{pypi_public_dataset}`
WHERE
project = '{params.pypi_project}'
AND {params.timestamp_column} >= TIMESTAMP("{params.start_date}")
AND {params.timestamp_column} < TIMESTAMP("{params.end_date}")
"""
Finally, the query is run through get_bigquery_result() and returns a Pandas dataframe. I like to use the loguru library to add some logging, but feel free to use the built-in logging feature from Python. This is a handful when debugging a pipeline to quickly spot where the problem is: at the source data or within the pipeline.
Copy code
def get_bigquery_result(
query_str: str, bigquery_client: bigquery.Client
) -> pd.DataFrame:
"""Get query result from BigQuery and yield rows as dictionaries."""
try:
# Start measuring time
start_time = time.time()
# Run the query and directly load into a DataFrame
logger.info(f"Running query: {query_str}")
dataframe = bigquery_client.query(query_str).to_dataframe()
# Log the time taken for query execution and data loading
elapsed_time = time.time() - start_time
logger.info(f"Query executed and data loaded in {elapsed_time:.2f} seconds")
# Iterate over DataFrame rows and yield as dictionaries
return dataframe
except Exception as e:
logger.error(f"Error running query: {e}")
raise
In models.py, we created a function to validated any Pydantic model against a given Pandas dataframe.
Copy code
def validate_dataframe(df: pd.DataFrame, model: Type[BaseModel]):
"""
Validates each row of a DataFrame against a Pydantic model.
Raises DataFrameValidationError if any row fails validation.
:param df: DataFrame to validate.
:param model: Pydantic model to validate against.
:raises: DataFrameValidationError
"""
errors = []
for i, row in enumerate(df.to_dict(orient="records")):
try:
model(**row)
except ValidationError as e:
errors.append(f"Row {i} failed validation: {e}")
if errors:
error_message = "\n".join(errors)
raise DataFrameValidationError(
f"DataFrame validation failed with the following errors:\n{error_message}"
)
In tests/ingestion/test_models.py we have a couple of unit tests around our Pydantic models : PypiJobParameters, FileDownloads.
DuckDB can also be used to create fixture data easily. Indeed, defining schema, especially with nested fields, can be cumbersome in Pandas. So, how do I validate my input dataframe from BigQuery?
One possible solution is to keep a sample data in .csv in your test folder, as it's easy to edit/adjust for unit testing purposes. The sample is located at tests/ingestion/sample_file_downloads.csv.
Then, you can create a fixture function that would load this CSV according to specific DuckDB schema :
Copy code
@pytest.fixture
def file_downloads_df():
# Set up DuckDB in-memory database
conn = duckdb.connect(database=":memory:", read_only=False)
conn.execute(
"""
CREATE TABLE tbl (
timestamp TIMESTAMP WITH TIME ZONE,
country_code VARCHAR,
url VARCHAR,
project VARCHAR,
file STRUCT(filename VARCHAR, project VARCHAR, version VARCHAR, type VARCHAR),
details STRUCT(
installer STRUCT(name VARCHAR, version VARCHAR),
python VARCHAR,
implementation STRUCT(name VARCHAR, version VARCHAR),
distro STRUCT(
name VARCHAR,
version VARCHAR,
id VARCHAR,
libc STRUCT(lib VARCHAR, version VARCHAR)
),
system STRUCT(name VARCHAR, release VARCHAR),
cpu VARCHAR,
openssl_version VARCHAR,
setuptools_version VARCHAR,
rustc_version VARCHAR
),
tls_protocol VARCHAR,
tls_cipher VARCHAR
)
"""
)
# Load data from CSV
conn.execute("COPY tbl FROM 'tests/ingestion/sample_file_downloads.csv' (HEADER)")
# Create DataFrame
return conn.execute("SELECT * FROM tbl").df()
Then this fixture can easily be reused, here we are testing the validate_dataframe() function
Copy code
def test_file_downloads_validation(file_downloads_df):
try:
validate_dataframe(file_downloads_df, FileDownloads)
except DataFrameValidationError as e:
pytest.fail(f"DataFrame validation failed: {e}")
Now we have these in place; we can start building the blocks in our pipeline.py
Copy code
def main(params: PypiJobParameters):
# Loading data from BigQuery
df = get_bigquery_result(
query_str=build_pypi_query(params),
bigquery_client=get_bigquery_client(project_name=params.gcp_project),
)
validate_dataframe(df, FileDownloads)
Now that we have our dataframe validated in memory, the fun (and easy!) part starts. We'll use DuckDB to push the data wherever we want. On top of that, DuckDB has a powerful extension mechanism that enables one to quickly load/install extensions for specific tasks like AWS authentification, pushing data to S3/MotherDuck, etc.
Thanks to Apache Arrow, DuckDB can directly query Pandas dataframe Python object.
So the first thing we'll do is to create a DuckDB table directly from that dataframe. Let's write a couple of helpers for this in duck.py.
The function below is creating a table from a Pandas dataframe object.
Copy code
def create_table_from_dataframe(duckdb_con, table_name: str, dataframe: str):
duckdb_con.sql(
f"""
CREATE TABLE {table_name} AS
SELECT *
FROM {dataframe}
"""
)
Now we can start a DuckDB connection and create this table in our pipeline.py
Copy code
def main(params: PypiJobParameters):
[...]
# Loading to DuckDB
conn = duckdb.connect()
create_table_from_dataframe(conn, params.table_name, "df")
[...]
A simple COPY command does the trick, so we can write this one directly in pipeline.py
Copy code    if "local" in params.destination:
        conn.sql(f"COPY {params.table_name} TO '{params.table_name}.csv';")
Feel free to play with other file formats if you prefer (e.g. Parquet).
We first need to load AWS credentials. In our helper file duck.py we have the bellow function.
Copy code
def load_aws_credentials(duckdb_con, profile: str):
duckdb_con.sql(f"CALL load_aws_credentials('{profile}');")
This function will load AWS credentials based on a profile name. It's actually calling a DuckDB extension behind the scenes, loading and installing it automatically!
Pushing data to S3 is a simple COPY command.
Copy code
def write_to_s3_from_duckdb(
duckdb_con, table: str, s3_path: str, timestamp_column: str
):
logger.info(f"Writing data to S3 {s3_path}/{table}")
duckdb_con.sql(
f"""
COPY (
SELECT *,
YEAR({timestamp_column}) AS year,
MONTH({timestamp_column}) AS month
FROM {table}
)
TO '{s3_path}/{table}'
(FORMAT PARQUET, PARTITION_BY (year, month), OVERWRITE_OR_IGNORE 1, COMPRESSION 'ZSTD', ROW_GROUP_SIZE 1000000);
"""
)
We are leveraging Hive partitioning to export the data as S3://my-bucket/year=2023/month=01/data.parquet, for example. We create the partition column directly from the timestamp_column in the SELECT statement.
To connect to MotherDuck is like installing another DuckDB extension. We only need to set the motherduck_token, which you can find on the MotherDuck Web UI.
Copy code
def connect_to_md(duckdb_con, motherduck_token: str):
duckdb_con.sql(f"INSTALL md;")
duckdb_con.sql(f"LOAD md;")
duckdb_con.sql(f"SET motherduck_token='{motherduck_token}';")
duckdb_con.sql(f"ATTACH 'md:'")
The ATTACH command works like attaching a local database. But we don't specify any database here; therefore, all remote databases in MotherDuck will be available to query.
Pushing data from a local DuckDB table to a remote MotherDuck table is just another COPY command :
Copy code
def write_to_md_from_duckdb(
duckdb_con,
table: str,
local_database: str,
remote_database: str,
timestamp_column: str,
start_date: str,
end_date: str,
):
logger.info(f"Writing data to motherduck {remote_database}.main.{table}")
duckdb_con.sql(f"CREATE DATABASE IF NOT EXISTS {remote_database}")
duckdb_con.sql(
f"CREATE TABLE IF NOT EXISTS {remote_database}.{table} AS SELECT * FROM {local_database}.{table} limit 0"
)
# Delete any existing data in the date range
duckdb_con.sql(
f"DELETE FROM {remote_database}.main.{table} WHERE {timestamp_column} BETWEEN '{start_date}' AND '{end_date}'"
)
# Insert new data
duckdb_con.sql(
f"""
INSERT INTO {remote_database}.main.{table}
SELECT *
FROM {local_database}.{table}"""
)
A couple of things here.
UPDATE command).Now that all our logic is present, the rest of the pipeline.py would be to import the functions and make a condition based on the sinking destination. This is defined through DESTINATION env var, a list that can include md, s3, or local.
Copy code
def main(params: PypiJobParameters):
[...]
# Loading to DuckDB
conn = duckdb.connect()
create_table_from_dataframe(conn, params.table_name, "df")
logger.info(f"Sinking data to {params.destination}")
if "local" in params.destination:
conn.sql(f"COPY {params.table_name} TO '{params.table_name}.csv';")
if "s3" in params.destination:
# install_extensions(conn, params.extensions)
load_aws_credentials(conn, params.aws_profile)
write_to_s3_from_duckdb(
conn, f"{params.table_name}", params.s3_path, "timestamp"
)
if "md" in params.destination:
connect_to_md(conn, os.environ["motherduck_token"])
write_to_md_from_duckdb(
duckdb_con=conn,
table=f"{params.table_name}",
local_database="memory",
remote_database="pypi",
timestamp_column=params.timestamp_column,
start_date=params.start_date,
end_date=params.end_date,
)
To pass all required parameters, we rely on environment variables. There's a template called
env.pypi_stats.template file that you can copy to a .env and fill in.
Copy code
TABLE_NAME=pypi_file_downloads
S3_PATH=s3://tmp-mehdio
AWS_PROFILE=default
GCP_PROJECT=devrel-playground-400508
START_DATE=2023-04-01
END_DATE=2023-04-03
PYPI_PROJECT=duckdb
GOOGLE_APPLICATION_CREDENTIALS=/root/.config/gcloud/devel-bigquery-read.json
motherduck_token=eyJhbGciOiJIUzI1NiIsInR5cCI6IkpXVCJ9.eyJzZXNzaW9uIjoibWVoZGkubW90aGVyZHVjay5jb20iLCJlbWFpbCI6Im1laGRpQG1vdGhlcmR1Y2suY29tIiwidXNlcklkIjoiZDc0NmUwM2UtOTA3OS00OGQ4LThiNmYtYjI1YTkzMWZhNzEyIiwiaWF0IjoxNzA1MzM2ODUyLCJleHAiOjE3MzY4OTQ0NTJ9.96UzWSOH4AOEPrlpcsaiR6VkjPk6_BT93dHleH9cWVY
TIMESTAMP_COLUMN=timestamp
DESTINATION=local,s3,md
The main environments you can adapt to change the behavior of the pipeline are the variables START_DATE, END_DATE, PYPI_PROJECT, and finally, the DESTINATION where you want to sink.
Next, install Python dependencies using make install.
Then let it quack with a make pypi-ingest 🎉
In this blog, we saw how we can easily leverage DuckDB as an entry point to push to different destinations. The power of built-in extensions simplifies the code base as we don't rely on any extra Python packages. We also saw interesting libraries like Pydantic to handle schema, fire for CLI, or loguru for logging.
Now that we have the raw data ready to be queried, we can start doing some transformation.
The next blog will dive into the transformation layer using dbt duckdb.
Now get out of here and get quacking. I mean, get coding.
2024/01/30 - Ryan Boyd
DuckDB news: Query Google Sheets with one line of SQL. Join across PostgreSQL, SQLite, and MySQL databases. ERPL extension connects SAP data. Harlequin terminal IDE launches.
2024/01/31 - David Neal
SQL is an accessible, ubiquitous, and valuable language you can learn in 2024. It’s a marketable skill that practically every organization needs.