2024/03/01 - Ryan Boyd
This Month in the DuckDB Ecosystem: February 2024
DuckDB news: v0.10.0 adds backwards-compatible storage and faster CSV parsing. PyAirbyte uses DuckDB as default cache. DuckDB-NSQL-7B LLM generates SQL locally.
- 10 min read
BY- 10 min read
BYdbt is a great and straightforward tool for building production-ready data pipelines with SQL. It acts as a toolkit that assists in packaging, testing, and deploying your SQL pipelines. However, there's a common misconception that dbt itself processes data. In reality, it's a client that sends SQL commands to a cloud data warehouse, where the actual computing occurs. As a result, you always depend on this cloud service, and the development loop can sometimes be challenging.
In this blog, we'll explore how the development experience can be significantly improved through the use of DuckDB and dbt. We'll learn how to streamline your architecture, accelerate certain pipelines, and finally allow you to write genuine unit tests. We'll also cover some best practices for AWS S3 authentication and managing incremental pipelines.
All the source code is available on GitHub. And for those who prefer watching over reading, I've got a video for you.
In the first part of our end-to-end data engineering project, we gathered data from PyPi to obtain download statistics for a specific Python library, DuckDB, using Python. In this second part, we'll transform this raw data using dbt and DuckDB to prepare a dataset ready for data visualization, which will be the focus of part three in this series.
Don't worry if you haven't completed the first part of the project; we've got you covered. We have some sample raw data available in a public AWS S3 bucket that you can use as input for the transformation pipeline.
In dbt, we connect to various databases through adapters, which are defined in a YAML file. These adapters make it easy to switch quickly between different environments. Typically, your Python process (dbt) would send the query to the target database.
However, since DuckDB is an embedded database and just another Python library to install (without any cloud dependency), we can run the computation within the same Python dbt process!
In this dbt project, we'll configure two setups (aka targets) using the dbt-duckdb adapter:
dev target): Reading and writing from S3 when using dbt and DuckDB locally for lightning-fast testing.prod target): Reading from S3 and pushing the resulting tables back to MotherDuck.Using the dbt-duckdb adapter makes switching between these environments as simple as changing your target definition.
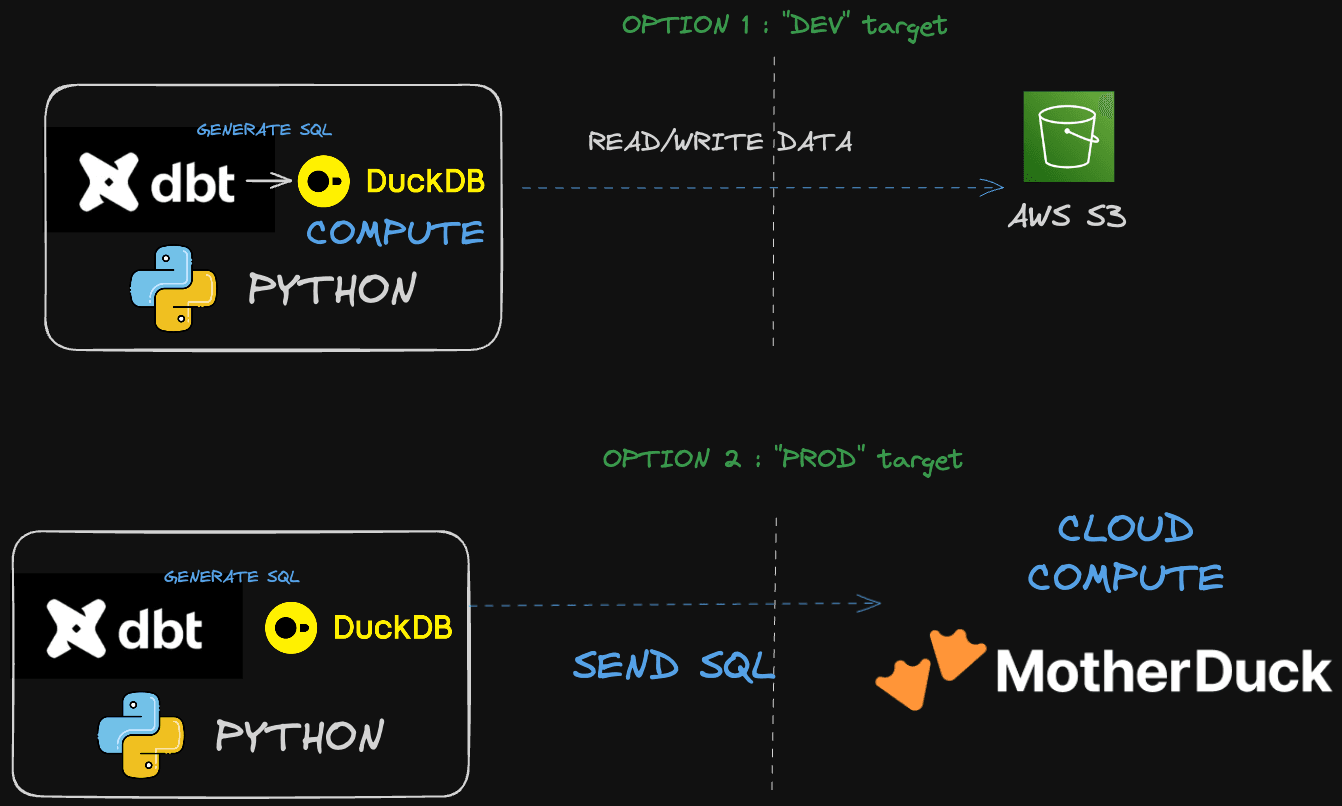
Since MotherDuck is DuckDB in the cloud, you benefit from a seamless transition from working locally to scaling in the cloud. Moreover, for part 3, as we aim to create a dashboard with a BI tool, which mostly relies on a SQL engine to fetch data, MotherDuck will prove to be very useful.
Let's dive into the code.
Our initial repository has a monolithic structure with the first part of the series located under /ingestion. We'll create a new folder under /transform for the code discussed in this blog.
First off, we need to add the dbt package dependency. As of now, MotherDuck supports only one version of DuckDB. We're using Poetry as our package manager, so to install dbt and the appropriate DuckDB version, simply execute:
Copy code
poetry add dbt-duckdb[md]
Next, initiate the dbt repository under ./transform with:
Copy code
dbt init pypi_metrics
You should now see a structure with some folders pre-created for you:
Copy code
.
├── analyses
├── dbt_project.yml
├── macros
├── models
├── package-lock.yml
├── packages.yml
├── profiles.yml
├── seeds
├── snapshots
├── target
└── tests
To start, I want to explore the raw data. You can access a free public sample here: s3://us-prd-motherduck-open-datasets/pypi/sample_tutorial/pypi_file_downloads/*/*/*.parquet
A straightforward way to begin is by using the DuckDB CLI. You can find the installation steps online. A useful setup I recommend -if you are using VSCode- is opening a terminal in VSCode and configuring a shortcut to send commands from the editor to the terminal (the opened DuckDB CLI).
I assigned the cmd+k shortcut to this specific command in my JSON Keyboard Shortcuts settings.
Copy code  {
    "key": "cmd+k",
    "command": "workbench.action.terminal.runSelectedText"
  },
That way, you are building your SQL query directly at the right place, in a SQL file
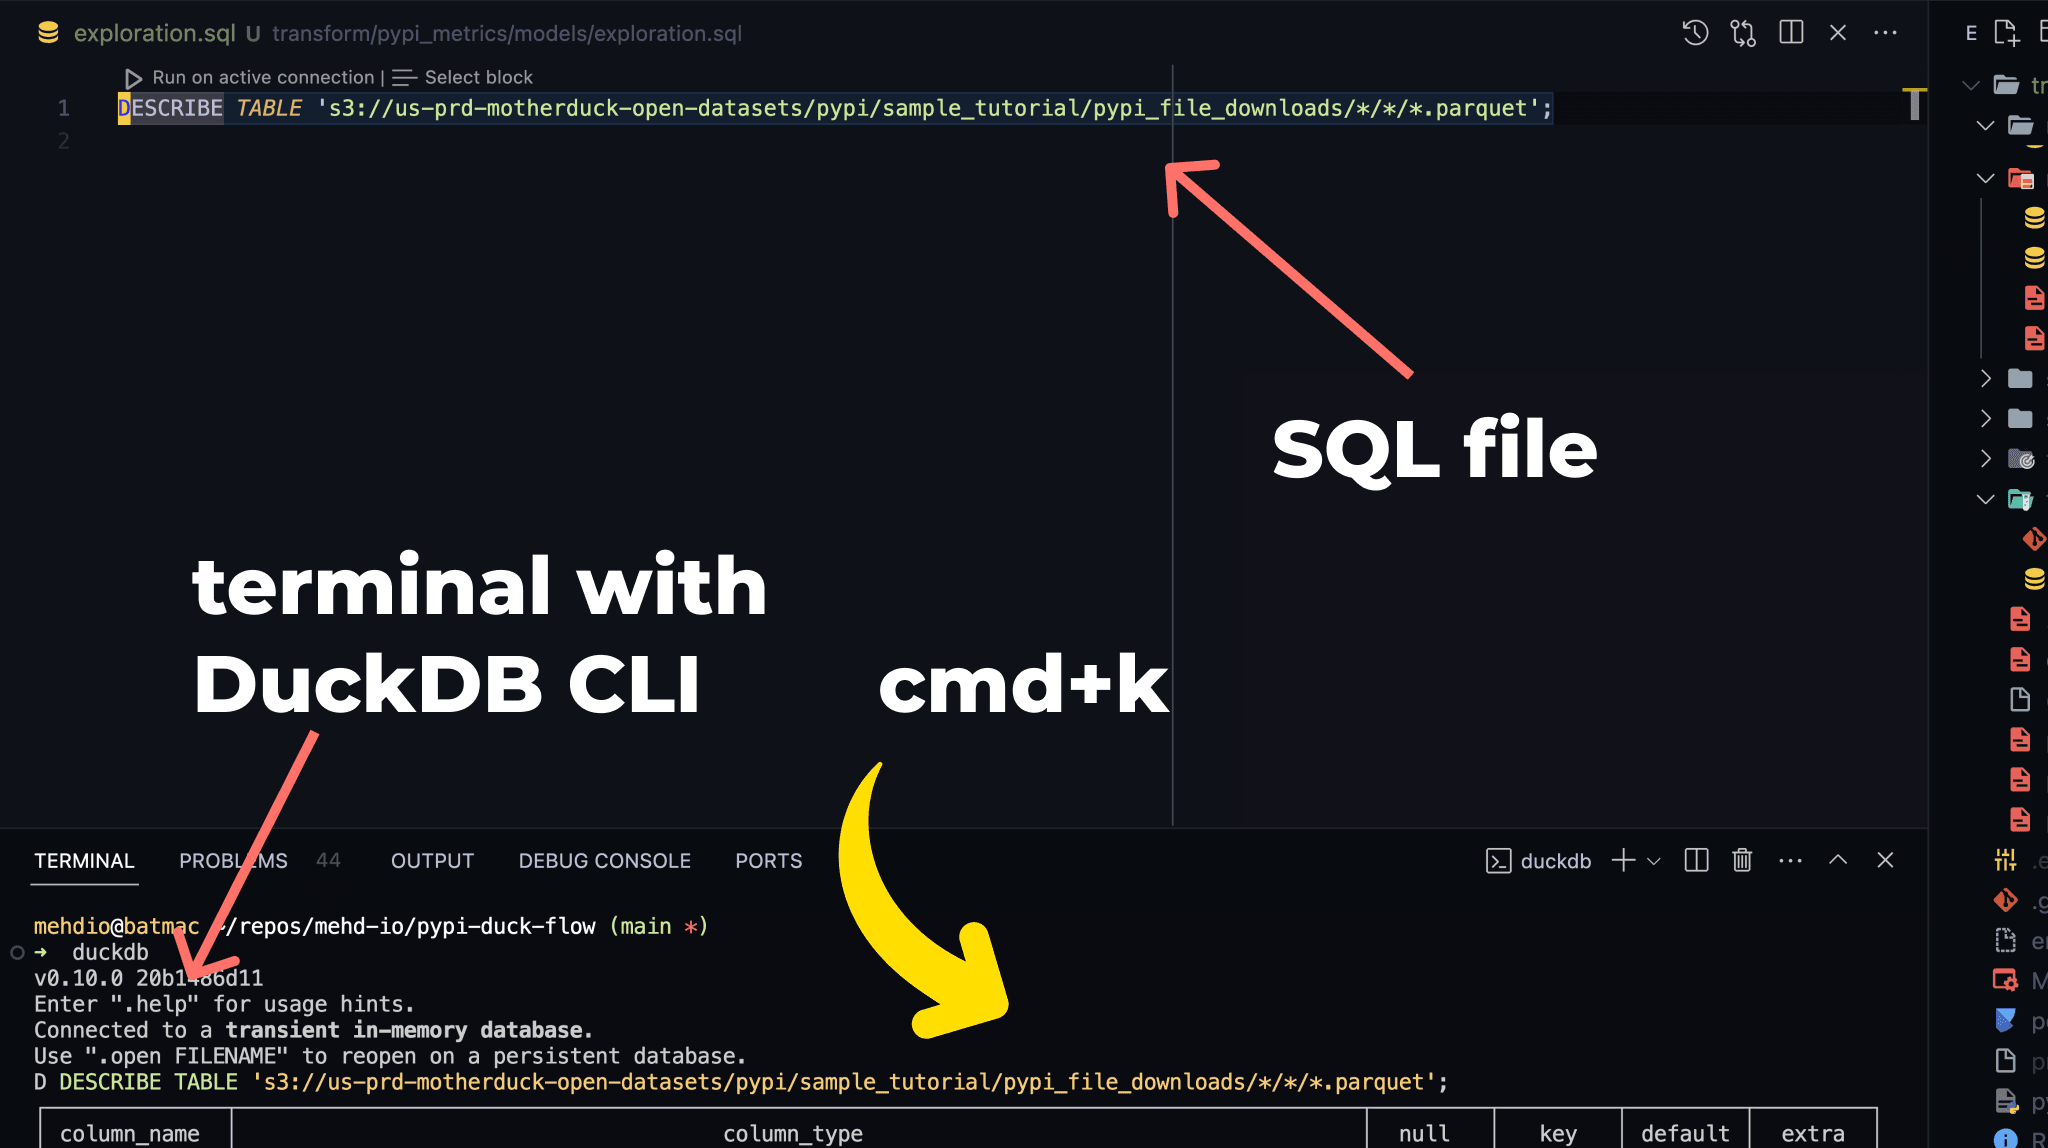
As you can see on the above screenshot, you can easily describe a remote parquet file using :
Copy code
DESCRIBE TABLE 's3://us-prd-motherduck-open-datasets/pypi/sample_tutorial/pypi_file_downloads/*/*/*.parquet';
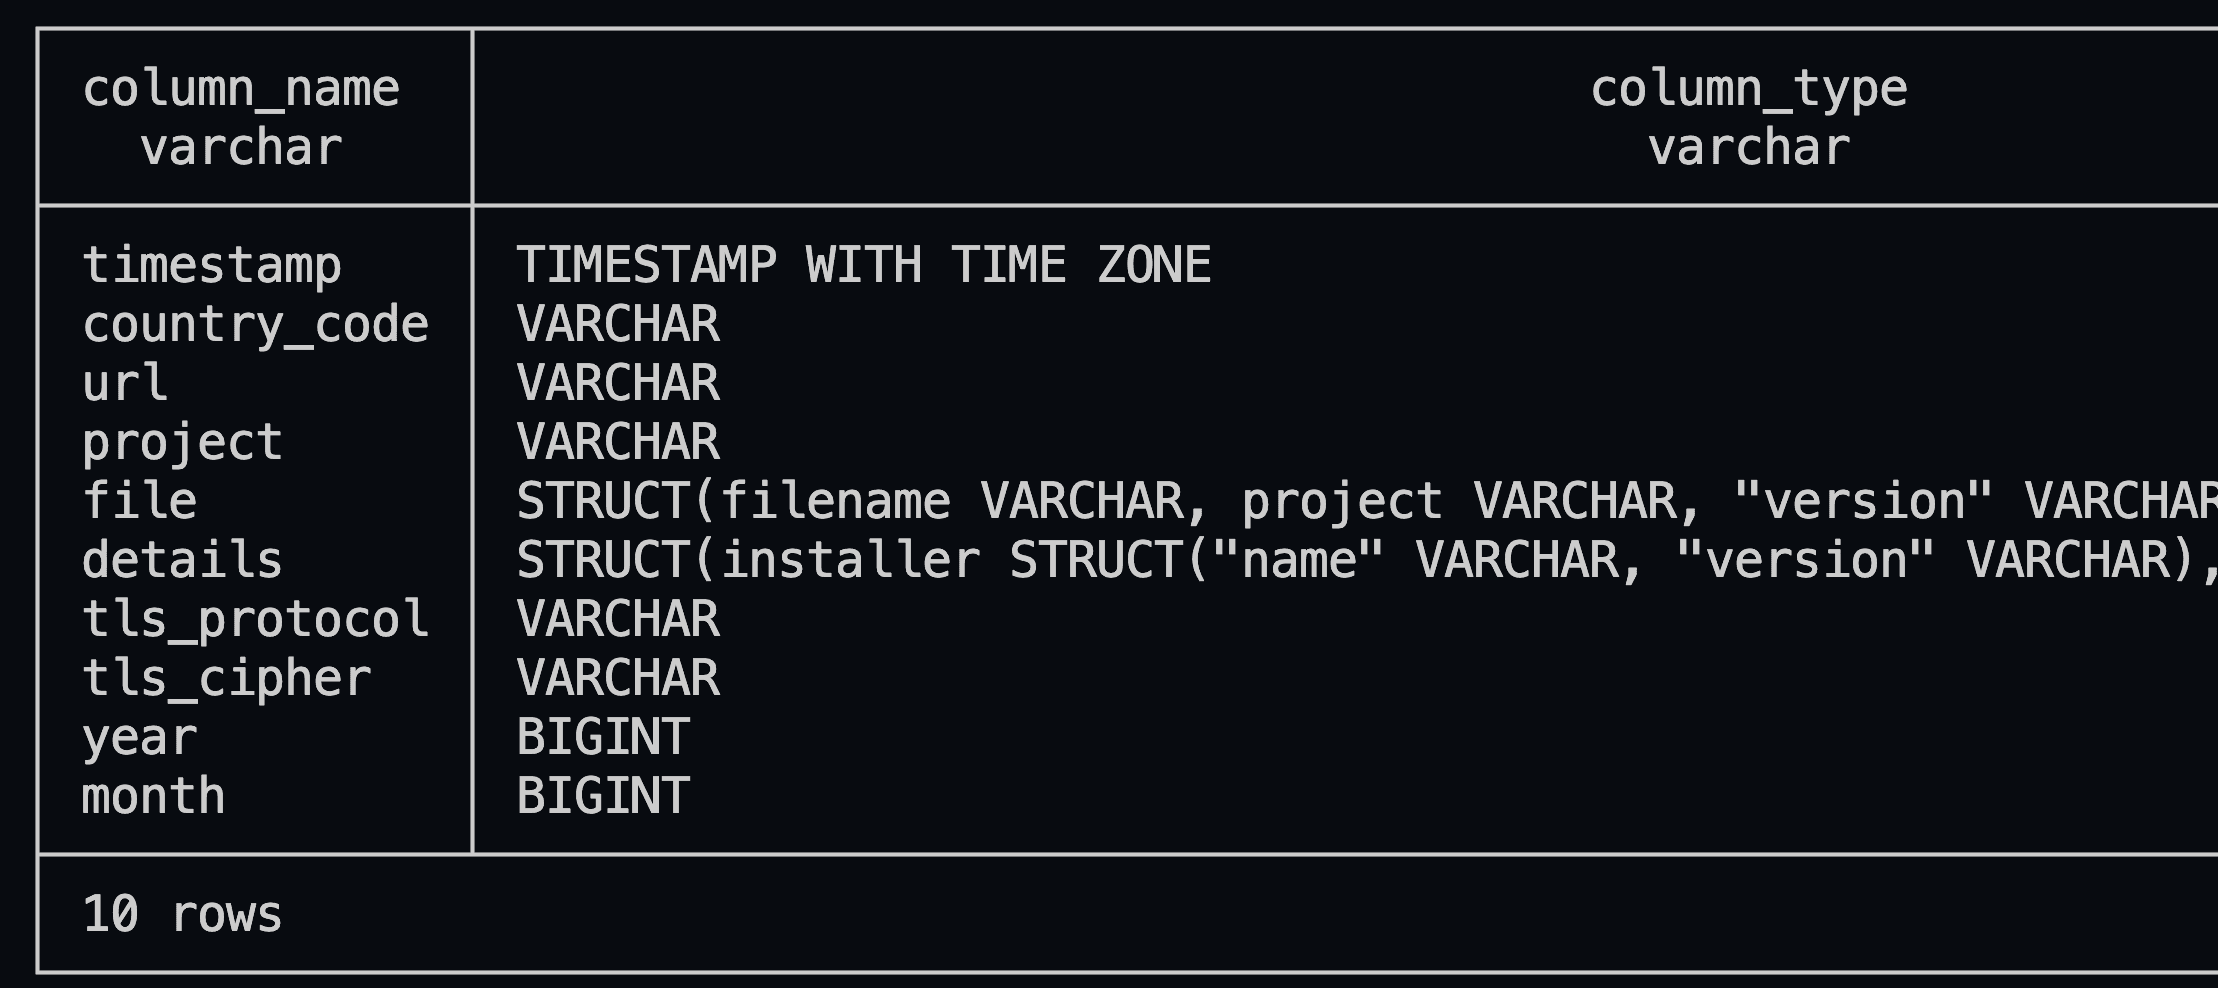
This data shows each row as a download of a specific Python project, already filtered for the duckdb project.
Our transformations should include:
load_id (based on a hash) for incremental loading.The final model is as follows:
Copy code
WITH pre_aggregated_data AS (
SELECT
timestamp :: date as download_date,
details.system.name AS system_name,
details.system.release AS system_release,
file.version AS version,
project,
country_code,
details.cpu,
CASE
WHEN details.python IS NULL THEN NULL
ELSE CONCAT(
SPLIT_PART(details.python, '.', 1),
'.',
SPLIT_PART(details.python, '.', 2)
)
END AS python_version
FROM
{{ dbt_unit_testing.source('external_source', 'pypi_file_downloads') }}
WHERE
download_date >= '{{ var("start_date") }}'
AND download_date < '{{ var("end_date") }}'
)
SELECT
MD5(CONCAT_WS('|', download_date, system_name, system_release, version, project, country_code, cpu, python_version)) AS load_id,
download_date,
system_name,
system_release,
version,
project,
country_code,
cpu,
python_version,
COUNT(*) AS daily_download_sum
FROM
pre_aggregated_data
GROUP BY
ALL
Notable points include:
start_date and end_date for easy data reprocessing.{{ dbt_unit_testing.source('external_source', 'pypi_file_downloads') }} for unit testing purposes (more on that further in the blog).Before we get to unit testing, let's review our configuration files, mainly sources.yml and dbt_project.yml and profiles.yml.
Sources are defined in sources.yml in /transform/pypi_metrics/models/sources.yml
Copy code
version: 2
sources:
- name: external_source
meta:
external_location: "{{ env_var('TRANSFORM_S3_PATH_INPUT') }}"
tables:
- name: pypi_file_downloads
We're using an external location (AWS S3) with a nickname that we referred to in our model's FROM statement earlier.
We've also made the S3 path flexible so it can be provided through environment variables.
To manage these environment variables smoothly, we use a Makefile along with a .env file. At the beginning of the Makefile, you'll see:
Copy code
include .env
export
In the code repository, there's an env.template file. You can copy this to create a .env file and enter the necessary values.
Next, we initiate the dbt run through an entry in the Makefile named pypi-transform:
Copy code
pypi-transform:
cd $$DBT_FOLDER && \
dbt run \
--target $$DBT_TARGET \
--vars '{"start_date": "$(START_DATE)", "end_date": "$(END_DATE)"}'
Let's have a look now on our dbt_project.yml
Copy code
models:
pypi_metrics:
pypi_daily_stats:
+materialized: "{{ 'incremental' if target.name == 'prod' else 'table' }}"
+unique_key: load_id
+pre-hook: "{% if target.name == 'dev' %}CALL load_aws_credentials(){% endif %}"
+post-hook: "{% if target.name == 'dev' %}{{ export_partition_data('download_date', this.name ) }}{% endif %}"
As mentioned before, we have two setups: one for local running and read/writing to AWS S3, and another using MotherDuck, designated as dev and prod targets, respectively.
To seamlessly switch between local execution and MotherDuck, you need to configure your profiles.yml file. The dbt-duckdb adapter allows you to define multiple targets easily. Here is a standard setup for our project:
Copy code
pypi_metrics:
target: dev
outputs:
dev:
type: duckdb
path: local_duckdb.db
prod:
type: duckdb
path: md:
This configuration ensures that your dev target runs entirely locally for a fast developer loop, while the prod target leverages MotherDuck for your final production pipeline.
The only difference between running locally and using MotherDuck is the path setting. Using md: triggers authentication with MotherDuck, which checks for a token in the motherduck_token environment variable. You can get this token from your MotherDuck account settings page.
We face a few challenges:
Thankfully, DuckDB offers extensions that simplify authentication and read/write operations to AWS S3. To address the first challenge, we write to AWS S3 with partitions, allowing us to process within a specific time frame and overwrite any existing partitions.
We use a simple macro, export_partition_data.sql, for this:
Copy code
{% macro export_partition_data(date_column, table) %}
{% set s3_path = env_var('TRANSFORM_S3_PATH_OUTPUT', 'my-bucket-path') %}
COPY (
SELECT *,
YEAR({{ date_column }}) AS year,
MONTH({{ date_column }}) AS month
FROM {{ table }}
)
TO '{{ s3_path }}/{{ table }}'
(FORMAT PARQUET, PARTITION_BY (year, month), OVERWRITE_OR_IGNORE 1, COMPRESSION 'ZSTD', ROW_GROUP_SIZE 1000000);
{% endmacro %}
With dbt running DuckDB, it creates an internal table from the model, allowing us to easily export this data to any format and remote storage (AWS S3/GCP Cloud storage) using the COPY command.
Notable points include:
s3://my-bucket/my_data/year=2024/month=04.For authentication, we use another extension and invoke CALL load_aws_credentials() as a pre-hook in the dbt_project.yml, looking for the default profile under ~/.aws.
With all configurations set for different environments, let's dive into unit testing.
DuckDB operates in-process, allowing us to iterate quickly on our model since computation occurs locally within the same dbt process. dbt is improving unit tests in its April 1.8 release, but currently, it's challenging to run tests without cloud dependencies. While you could install Postgres locally, it's an additional step.
For unit testing, we use the dbt-unit-testing dbt package, added to a packages.yml file at the root of your dbt directory:
Copy code
packages:
- git: "https://github.com/EqualExperts/dbt-unit-testing"
revision: v0.4.12
First, install the package by running dbt deps. This step allows us to use SQL for defining our mock data, both the input and the expected outcome, and then run the model using dbt-duckdb right on our local machine.
Next, dive into the tests folder and craft a new SQL file named test_pypi_daily_stats.sql:
Copy code
{{ config(tags=['unit-test']) }}
{% call dbt_unit_testing.test ('pypi_daily_stats','check_duckdb_downloads_on_20230402') %}
{% call dbt_unit_testing.mock_source('external_source', 'pypi_file_downloads') %}
SELECT
'2023-04-02 14:49:15+02'::timestamp AS timestamp,
'US' AS country_code,
'/packages/38/5b/...' AS url,
'duckdb' AS project,
NULL AS file, -- Assuming the 'file' struct is not essential for this test
STRUCT_PACK(
installer := NULL,
python := '3.8.2',
implementation := NULL,
distro := NULL,
system := STRUCT_PACK(name := 'Linux', release := '4.15.0-66-generic'),
cpu := 'x86_64',
openssl_version := NULL,
setuptools_version := NULL,
rustc_version := NULL
) AS details,
'TLSv1.2' AS tls_protocol,
'ECDHE-RSA-AES128-GCM-SHA256' AS tls_cipher
UNION ALL
SELECT
'2023-04-02 14:49:15+02'::timestamp AS timestamp,
'US' AS country_code,
'/packages/38/5b/...' AS url,
'duckdb' AS project,
NULL AS file, -- Assuming the 'file' struct is not essential for this test
STRUCT_PACK(
installer := NULL,
python := '3.9.1',
implementation := NULL,
distro := NULL,
system := STRUCT_PACK(name := 'Linux', release := '4.15.0-66-generic'),
cpu := 'x86_64',
openssl_version := NULL,
setuptools_version := NULL,
rustc_version := NULL
) AS details,
'TLSv1.2' AS tls_protocol,
'ECDHE-RSA-AES128-GCM-SHA256' AS tls_cipher
-- Add more rows as needed for your test
{% endcall %}
{% call dbt_unit_testing.expect() %}
SELECT
'2023-04-02'::date AS download_date,
'duckdb' AS project,
'3.8' AS python_version,
'x86_64' AS cpu,
'Linux' AS system_name,
2 AS daily_download_sum -- Adjust this based on the expected outcome of your test
{% endcall %}
{% endcall %}
This test is structured in three key parts:
{% call dbt_unit_testing.test('pypi_daily_stats', 'check_duckdb_downloads_on_20230402') %}.{% call dbt_unit_testing.mock_source('external_source', 'pypi_file_downloads') %}, which uses SQL to simulate the data. This method allows for the easy definition of complex data structures, perfect for working with DuckDB.{% call dbt_unit_testing.expect() %} to verify our model's output.Run the test by executing:
Copy code
dbt test
Or, use the Makefile shortcut make pypi-transform-test to initiate testing directly from the project's root folder.

The testing process is swift, typically taking less than two seconds!
This blog has highlighted the dbt-duckdb adapter's contributions, showcasing it as more than a new dbt destination. It introduces a revitalized developer experience, enabling local prototyping, cloud-independent unit testing, and smooth transitions to cloud deployments with MotherDuck. Up next in this series, we'll breathe life into our PyPi dataset by creating a dashboard.
In the meantimes, keep quacking and keep coding.
2024/03/01 - Ryan Boyd
DuckDB news: v0.10.0 adds backwards-compatible storage and faster CSV parsing. PyAirbyte uses DuckDB as default cache. DuckDB-NSQL-7B LLM generates SQL locally.
2024/03/11 - Joseph Hwang
Differential Storage: A Key Building Block For A DuckDB-Based Data Warehouse