2026/04/17 - Simon Späti
DuckDB Ecosystem Newsletter : April 2026
DuckLake 1.0 ships, Lance adds vector search, Rust-native extension
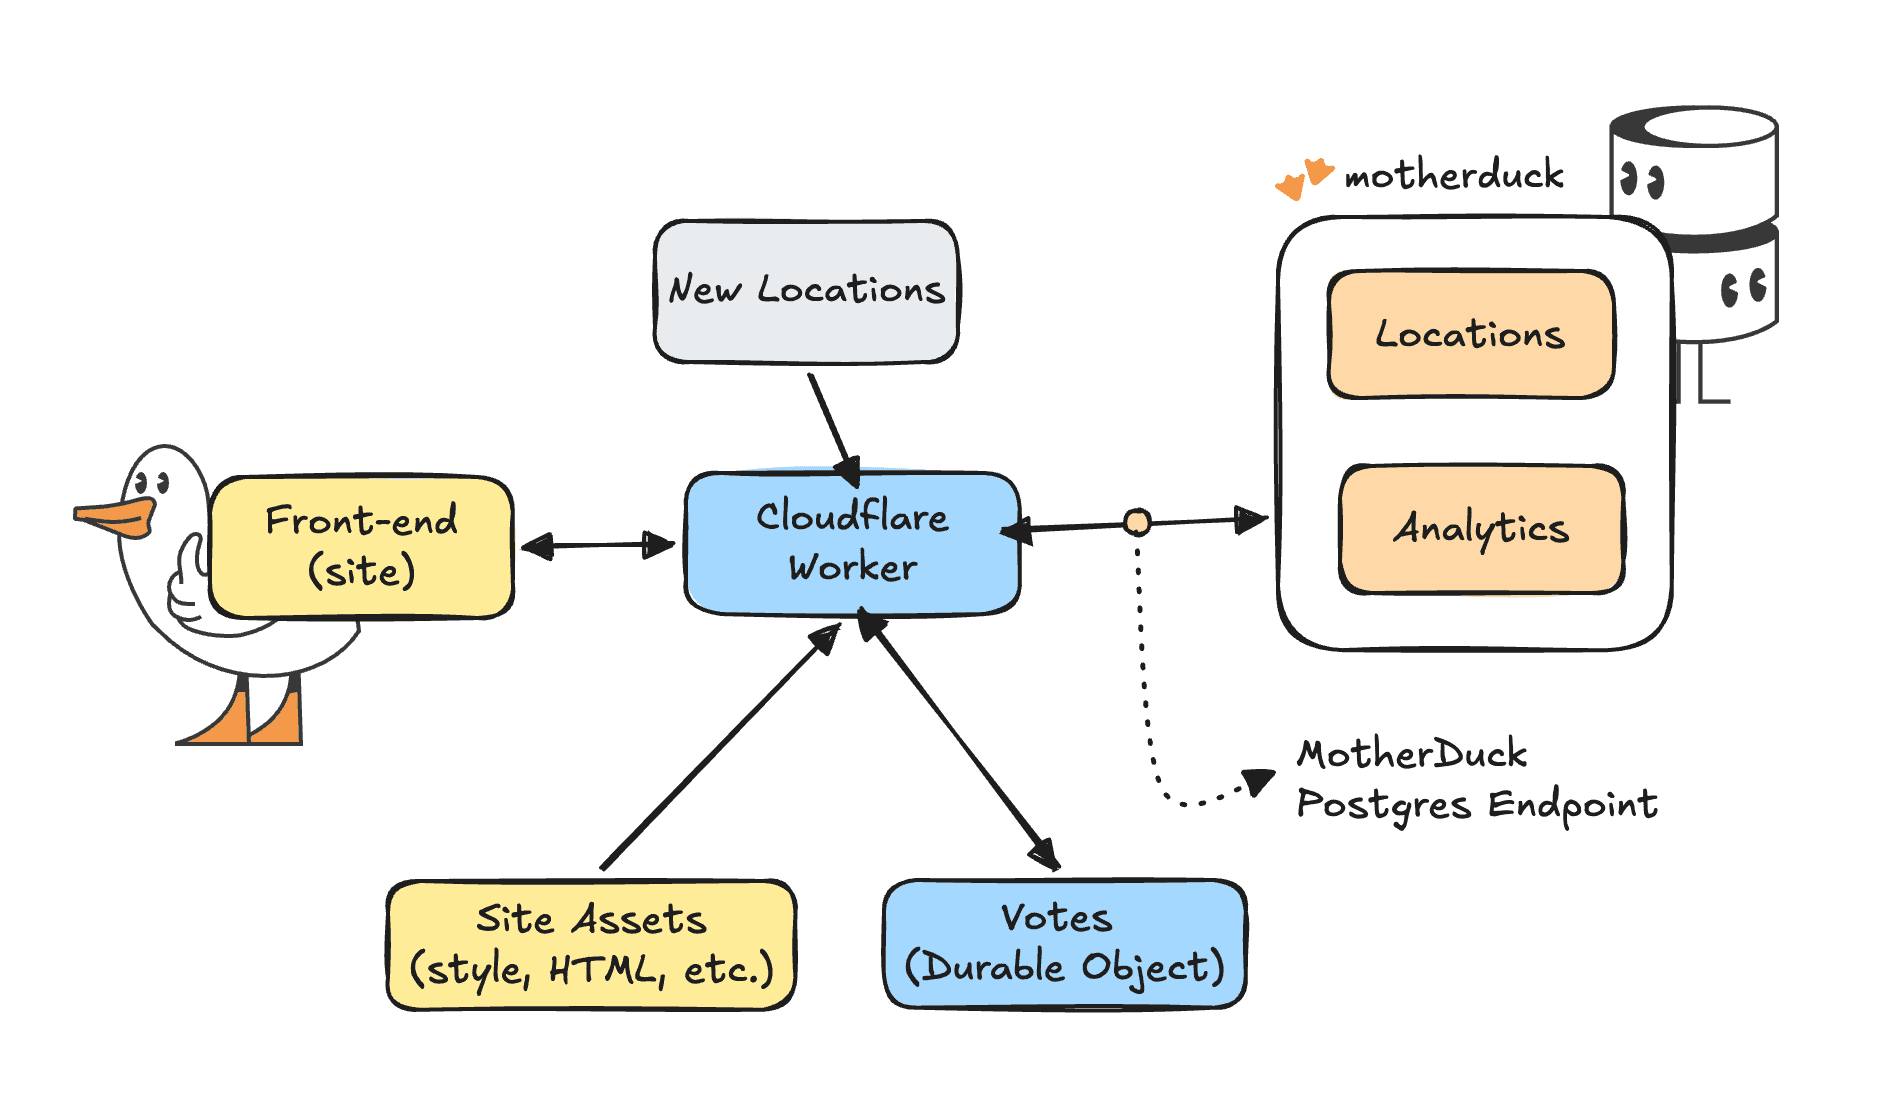
So, you want real time and interactive, but handle large analytical data at the same time? Cloudflare Workers are small serverless functions that allow you to create fast, scalable apps on Cloudflare's edge network. However, Cloudflare Workers are lightweight functions and therefore do not support native DuckDB bindings. They can, however, connect to MotherDuck through the Postgres endpoint using the pg package. This gives you an alternative path to query MotherDuck from edge functions without relying on DuckDB dependencies. In this post we’ll build a end-to-end application with a TypeScript back-end and a front-end app with HTML/CSS. Let’s go!
Let’s address the elephant in the room first. You don't have to write the code for this. We've created a prompt.md file for you to just point your LLM at, fill in some questions and build a similar application with your own requirements. That being said, there's still a lot of value in understanding the architecture and how the specific components work together. Going deeper into the underlying code will also help you debug issues and adjust the app to your needs.
First, we need to ask ourselves: why would we even want this? Why not just spin up a server or container on a regular cloud provider? Cloudflare's edge network is closer to your users than most datacenters, so the main answer is speed. Apart from speed, Cloudflare Workers are very light, fast to start, and relatively cheap serverless functions. They integrate nicely with other Cloudflare features like routing for your website or web app and caching and storage closer to your users and of course a bunch of AI features like inference and embeddings.
The speed and edge functionality allows us to create real-time applications for users, which is exactly what we will do. The head ducks at Duckoffee have requested our help to open a branch in a new city. We need to build an app to let everyone vote on their favorite new location. And of course the dashboard needs to be real-time for everyone.
The goal is to have an interactive map to see existing and potential locations. For existing locations we can see the revenue and products for that location. That means we need the following components.
You can follow along from the example repo, or start here from scratch. You can copy-paste code into Cloudflare workers, but a more reliable way is to use a Cloudflare tool called Wrangler. So we'll create a new directory for our project and install wrangler.
Copy code
mkdir motherduck-worker && cd motherduck-worker
npm init -y
npm install pg@^8.16.3
npm install --save-dev wrangler @types/pg
Wrangler allows us to configure our project and necessary variables in a simple config file.
Copy code
# wrangler.toml
name = "duckoffee-map"
main = "src/index.ts"
compatibility_date = "2026-04-01"
compatibility_flags = ["nodejs_compat"]
[assets]
directory = "./public"
binding = "ASSETS"
not_found_handling = "single-page-application"
[vars]
MOTHERDUCK_HOST = "pg.us-east-1-aws.motherduck.com"
MOTHERDUCK_DB = "sample_data"
DUCKOFFEE_SHARE = "md:_share/duckoffee/1877e7c6-96ea-4f88-a01f-3fed396ea7b8"
[[durable_objects.bindings]]
name = "VOTES"
class_name = "VoteTracker"
[[migrations]]
tag = "v1"
new_sqlite_classes = ["VoteTracker"]
As you can see, this already covers most of what we need:
src/index.tsVoteTracker "table" in our Durable Objects store to capture votes in real time. We use Durable Objects, as opposed to Cloudflare KV because it allows us to have a real time consistent store instead of an eventually consistent store.The essence of the worker is a few dependencies and a specific handling per path. If you're already using Cloudflare for your domains, this allows you to easily map something like a /api path to a specific worker. For now we import the Postgres and Durable Object dependencies, expose the bindings we configured before, and map incoming requests either to a function or to our static assets.
Copy code
import { Client, type QueryResult } from "pg";
import { DurableObject } from "cloudflare:workers";
export interface Env {
MOTHERDUCK_HOST: string;
MOTHERDUCK_DB: string;
MOTHERDUCK_TOKEN: string;
DUCKOFFEE_SHARE: string;
ASSETS: Fetcher;
VOTES: DurableObjectNamespace<VoteTracker>;
}
export default {
async fetch(req: Request, env: Env, ctx: ExecutionContext): Promise<Response> {
const url = new URL(req.url);
try {
if (url.pathname === "/api/locations") {
return await handleLocations(req, env);
}
if (url.pathname === "/api/sales") {
return await handleSales(req, env);
}
if (url.pathname === "/api/summary") {
return await handleSummary(req, env);
}
if (url.pathname === "/api/votes" && req.method === "GET") {
return await handleVotesGet(req, env);
}
if (url.pathname === "/api/votes" && req.method === "POST") {
return await handleVoteCast(req, env);
}
} catch (err) {
return new Response(JSON.stringify({ error: "Query failed", detail: String(err) }), { status: 502 });
}
return env.ASSETS.fetch(req);
},
};
Of course, we all want to get our hands on that precious data. The power of MotherDuck doing those fast summary analytics over large amounts of data. I will show you how to get the summary statistics per location, if you'd like to see the queries for the per-day chart and top products you can find those in the repo again. They're almost identical to our summary statistics query.
Before we start querying, we'll create a client that allows us to connect to MotherDuck and make sure we attach the database (or share) we need. Additionally we have a small helper function to take some data as input and return an actual JSON response to the browser.
Copy code
async function withClient<T>(env: Env, fn: (c: Client) => Promise<T>): Promise<T> {
const connectionString = `postgresql://anyusername:${env.MOTHERDUCK_TOKEN}@${env.MOTHERDUCK_HOST}:5432/${env.MOTHERDUCK_DB}?sslmode=require`;
const client = new Client({ connectionString });
await client.connect();
try {
await client.query(`ATTACH IF NOT EXISTS '${env.DUCKOFFEE_SHARE}' AS duckoffee`);
return await fn(client);
} finally {
await client.end();
}
}
function json(data: unknown, status = 200): Response {
return new Response(JSON.stringify(data), {
status,
headers: { "content-type": "application/json" },
});
}
Now that we have a way to query our database on MotherDuck, we can define our handleSummary function. It takes both the environment and the actual request to Cloudflare as an input. This allows us to get the location ID that the user selected as a parameter in the URL. We use that location ID in the WHERE clause to filter our data. Of course, as with any input from the big bad internet, make sure it is sanitized correctly before you send it to your database. In this case we make sure it can only be a number or null value.
Copy code
async function handleSummary(env: Env, req: Request): Promise<Response> {
const locationParam = new URL(req.url).searchParams.get("location_id");
const locationId = locationParam ? parseInt(locationParam, 10) : null;
if (locationParam && (locationId === null || Number.isNaN(locationId))) {
return json({ error: "Invalid location_id" }, 400);
}
const result: QueryResult = await withClient(env, (c) =>
c.query(
`
SELECT
count(*)::INTEGER AS orders,
round(sum(order_total), 2) AS revenue,
round(avg(order_total), 2) AS avg_order
FROM duckoffee.orders
WHERE $1::BIGINT IS NULL OR location_id = $1::BIGINT
`,
[locationId],
),
);
return json({
location_id: locationId,
...result.rows[0], // the first row contains our metrics
});
}
Next up we need our voting system. The handleLocations function gets locations from the MotherDuck database, but of course we also need to define new candidate locations, which we'll do in the code for now.
Copy code
const CANDIDATES = [
{ id: "mexico-city", name: "Mexico City", country: "Mexico", lon: -99.1332, lat: 19.4326 },
{ id: "toronto", name: "Toronto", country: "Canada", lon: -79.3832, lat: 43.6532 },
// ...
];
With a GET request, we'll retrieve the votes per location, and a POST request allows us to cast our vote. The simplest version would be a counter that increments per location. However, we want people to also change their vote as they go along and we want just a bit more friction to prevent people from just voting over and over again. To achieve that, we need to extend the Durable Object class a bit. We can add two methods to it that will help us manipulate the data.
cast method that allows us to cast a vote with an identifier for our current session, or update that vote to a different locationsnapshot method to determine the voting results both globally and for the session at a point in timeCopy code
export class VoteTracker extends DurableObject<Env> {
// First make sure there's actually a table to work with
constructor(ctx: DurableObjectState, env: Env) {
super(ctx, env);
ctx.storage.sql.exec(`
CREATE TABLE IF NOT EXISTS votes (
session_id TEXT PRIMARY KEY,
candidate_id TEXT NOT NULL,
cast_at INTEGER NOT NULL
)
`);
}
async cast(sessionId: string, candidateId: string): Promise<void> {
// Insert the user's vote or update it
this.ctx.storage.sql.exec(
`INSERT INTO votes (session_id, candidate_id, cast_at)
VALUES (?, ?, ?)
ON CONFLICT(session_id) DO UPDATE SET
candidate_id = excluded.candidate_id,
cast_at = excluded.cast_at`,
sessionId,
candidateId,
Date.now(),
);
}
async snapshot(
sessionId: string | null,
): Promise<{ tallies: Record<string, number>; yourVote: string | null }> {
// count of votes per location
const rows = this.ctx.storage.sql
.exec(`SELECT candidate_id, count(*) AS c FROM votes GROUP BY candidate_id`)
.toArray();
const tallies: Record<string, number> = {};
for (const row of rows) {
tallies[row.candidate_id as string] = row.c as number;
}
let yourVote: string | null = null;
if (sessionId) {
// Retrieve the user's vote for this session
const mine = this.ctx.storage.sql
.exec(
`SELECT candidate_id FROM votes WHERE session_id = ? LIMIT 1`,
sessionId,
)
.toArray();
if (mine.length > 0) yourVote = mine[0].candidate_id as string;
}
return { tallies, yourVote };
}
}
Now that we have a way to interact with the Durable Object we can manipulate it to our needs for the handleVotes functions. First up we need to get both your vote and the totals per candidate location. Once we have those, we can map them to the candidate object and show them on the map.
Copy code
async function handleVotesGet(req: Request, env: Env): Promise<Response> {
const url = new URL(req.url);
const sessionId = url.searchParams.get("session_id");
// A stub is a client Object used to send messages to the Durable Object.
const stub = env.VOTES.get(env.VOTES.idFromName("global"));
const { tallies, yourVote } = await stub.snapshot(sessionId);
const candidates = CANDIDATES.map((c) => ({ ...c, votes: tallies[c.id] ?? 0 }));
return json({ candidates, your_vote: yourVote });
}
Similarly we can create a function for casting a vote. It just checks if there's a session ID and a valid candidate ID. Of course, you can easily hack this system by opening a private browser window, but you can also see that it wouldn't take that much more effort to add in user authentication if you wanted to. The mechanics would be very similar.
Copy code
async function handleVoteCast(req: Request, env: Env): Promise<Response> {
const body = (await req.json().catch(() => ({}))) as {
session_id?: string;
candidate_id?: string;
};
const sessionId = body.session_id;
const candidateId = body.candidate_id;
if (!sessionId || typeof sessionId !== "string" || sessionId.length > 64) {
return json({ error: "Missing or invalid session_id" }, 400);
}
if (!candidateId || !CANDIDATE_IDS.has(candidateId)) {
return json({ error: "Invalid candidate_id" }, 400);
}
const stub = env.VOTES.get(env.VOTES.idFromName("global"));
await stub.cast(sessionId, candidateId);
return json({ ok: true, your_vote: candidateId });
}
So far we have developed our API. We can interact with it through calling a URL and getting a JSON response. We live in a world where most of the front-end code these days is generated by AI. I'll be honest, most of the front-end for this example is too, but it helps to know and understand the mechanics of what's going on, rather than blindly trusting your LLM.
The index.html file and style.css generate a nice looking framework, a kind of skeleton within which we can inject our data and content. The D3 javascript library allows us to create beautiful, custom visualizations and TopoJSON allows us to create a good looking map out of the box. Since our API is already nicely formatted JSON, most of what we do is just calling that API and adding the JSON response in the right place in the right format. For example, this refreshVotes function is called every 5 seconds to update the votes. You can see it calls the votes API with the session ID then renders the total votes, the leader board and the map.
Copy code
async function refreshVotes() {
try {
const data = await fetchJSON(`/api/votes?session_id=${encodeURIComponent(state.sessionId)}`);
state.candidates = data.candidates || [];
state.totalVotes = data.total_votes || 0;
state.yourVote = data.your_vote || null;
document.getElementById("vote-count").textContent =
new Intl.NumberFormat().format(state.totalVotes);
renderLeaderboard();
if (svgRef.current && projectionRef.current) {
drawCandidates(svgRef.current, projectionRef.current);
}
} catch (err) {
console.warn("vote refresh failed", err);
}
}
We've seen that we can create a simple application that handles both real time interactivity across the world at scale, as well as large analytical workloads through MotherDuck. We have used a Cloudflare Worker to route traffic to our application and act as an API, we have used Durable Objects as a real time store and MotherDuck as the analytical back-end.
Cloudflare is great at providing performance at the edge, while MotherDuck is great at analytical and data workloads. You can take this any direction you like depending on your use case. Here are a few examples.
Now that you've made it all the way to the end, have a look at the final product or the repository.
If you need any help with your use case or have questions about your architecture, don't hesitate to reach out.
2026/04/17 - Simon Späti
DuckLake 1.0 ships, Lance adds vector search, Rust-native extension

2026/04/20 - Mehdi Ouazza, Leonardo Vida, Samantha Lohier
MotherDuck Agent Skills is an open-source catalog that teaches AI coding agents how to work with MotherDuck: exploring schemas, writing DuckDB SQL, using the REST API, and building Dives. If MCP gives agents hands, skills give them a playbook.