BLOG
Now that we are charging users to use MotherDuck, I thought it would be fun to have a bell that rang every time a customer signed up. Of course, this being a duck-themed company, someone quickly made the suggestion that it shouldn’t be a bell, it should be a “quack”.
This seemed like a fun weekend project. At a high level, I’d get a Raspberry Pi, and have it poll for new customers, and then play a sound when we found a new one. Also, being a database company, of course it would use MotherDuck. Of course, I didn’t know anything about how to use a Raspberry Pi, so this seemed like a good excuse to learn. You can find all of the code used in this post on this github repository.
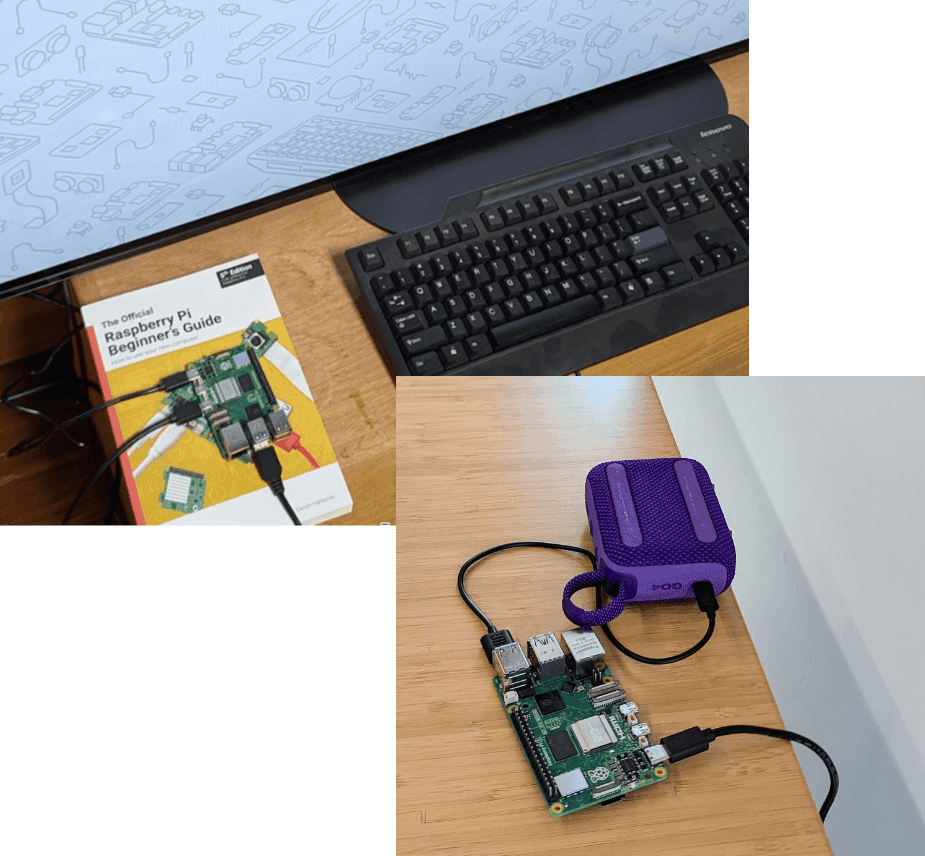
First, I bought a Raspberry Pi 5 from the manufacturer. In addition to the core device, I also bought the OS on a micro SD card, a micro-HDMI to HDMI cable, and a power supply cable. The other things that I needed were a monitor (I didn’t have an HDMI monitor at home, so I used my TV), a USB keyboard and mouse, Wifi, and a bluetooth speaker. That’s it.
How do we figure out when a new customer signs up? When someone signs up for billing, we log an event that makes its way into our data warehouse, which is, of course, MotherDuck. We don’t show that part here, we just assume that it works.
In order to find out whether there are new signups, we periodically poll the MotherDuck data warehouse, and if there is a new account we haven’t seen before, we save that information on the device. MotherDuck always runs DuckDB on the client as well as on the server; we can take advantage of this to write results to the DuckDB instance on the Raspberry PI.
We have a couple of different choices for how to understand what is “new”. The easiest would be to just store the timestamp of the last time we polled, then we could look for signups that are more recent. However, I decided to do something a little bit different and store all of the account IDs that we’ve seen before. The rationale is that I might want to also have a lightboard that shows the names of the recent accounts, or scrolls through our customer names in a leaderboard fashion. Storing the account names locally gives us more flexibility, and also gives us a chance to show off more DuckDB features.
The nice thing about this mechanism is that we can do everything in one query; both look for new accounts and add them to our local table. Here is the query:
Copy code
INSERT INTO local_accounts
WITH conversions AS (
SELECT MIN(event_ts) as convert_ts, org_id
FROM mdw.events
WHERE event_name='org_updated_payment_method'
GROUP BY ALL
)
SELECT org_id, convert_ts
FROM conversions
WHERE organization_id NOT IN (SELECT DISTINCT org_id FROM local_accounts)
How does this query work? We have a common table expression (CTE) that finds all of the org_updated_payment_method events in our event log stored in the cloud. We then take the earliest timestamp that we’ve seen for each organization that has one of those events. That’s the “conversion time” broken down on a per organization basis..
Next we compare that to organizations that we have locally, and we find all of the orgs that we haven’t seen before. We then insert those back into the local table.
Note that this query both polls for new events and transactionally updates the local stored version. An INSERT query returns the number of rows inserted, so we can play a sound for each inserted row. If no new customers have shown up, no rows will be inserted and we won’t play the sound.
After figuring out the query to run, next I had to get it to run from a Raspberry Pi on a schedule.
This was the first time I had played with a Raspberry Pi, so I was a bit nervous that it would be difficult. But the Rasperry Pi linux that ships on the micro SD card is pretty robust, and makes it pretty easy to get started. The only thing that was confusing was where to put the micro SD card; there didn’t seem to be a place for it; it is actually on the reverse side of the device.
After plugging in the power, connecting the micro HDMI to HDMI, connecting a USB keyboard, and booting the device, I was able to follow the prompts and connect to my Wifi and download and install updates. This went pretty smoothly, it just took a few minutes for everything to update.
The hardest part of the setup was enabling sound and connecting to my bluetooth speakers. To enable audio, I used pulseaudio, which is installed via the command
Copy code
sudo apt install pulseaudio-module-bluetoot
Then to pair with my bluetooth speakers, I used bluetoothctl. In the bluetooth control tool, type power on to turn on bluetooth, scan on to turn on scanning for devices. Then you should put your speakers in paring mode, and you’ll see them show up in the output. Match up the MAC address of your speakers, and then tell the device to pair with pair <mac address>. Then you should also tell it to trust that device, via trust <mac address>.
Here is a modified version of my session:
Copy code
$ bluetoothctl
Agent registered
[bluetooth]# power on
Changing power on succeeded
# agent on
# scan on
<turn on pairing mode>
Find name of speaker
# pair 00:21:3C:96:CB:40
<paired>
# trust 00:21:3C:96:CB:40
Once this was done, I couldn’t play sounds through the speaker until I had selected the speaker in the UI. This was a little bit annoying, since I had to use the mouse. In the Raspberry PI UI, I right-clicked on the bluetooth icon in the top right corner, and selected my speakers. Otherwise it tried to play sound through the TV.
After turning on bluetooth, I decided that I would rather work from my laptop than the raspberry PI directly, and switched to an SSH session. To do this, I turned on SSH by going to the raspberry PI preferences and then settings. There is a toggle to enable SSH. Next, I needed to find the IP address on my WIFI network of the device. To do this, I ran ifconfig. This then shows the configuration of the various networking adapters. The wifi one was under wlan0. The IP address will look like `192.168.X.Y’. You can then use this to ssh from another machine.
On my laptop, I ssh’d into the machine via the command ssh jordan@192.168.X.Y. This meant I didn’t have to be physically connected to the Raspberry PI device, which was especially useful when I was writing Python code, since I had an editor set up on my laptop.
Once ssh was set up, I could also use scp to copy files to the raspberry pi. This let me work on the code in a local editor on my laptop, and then scp them over to test it out. An example is scp quack.py jordan@192.168.7.118:quack.py
There are two python packages that I needed on the raspberry pi; duckdb and pygame. The duckdb package is for talking to DuckDB and MotherDuck, and pygame is for playing sound.
First, however, I set up a virtual environment so we don’t hose the python environment. The command
Copy code
$ python -m venv .venv
sets up a trivial virtual environment. We then want to use the python instance in ./bin/python instead of the default one. We can do that by running export PATH=~/.venv/bin:$PATH
Now, we install duckdb and pygame:
Copy code
$ pip install duckdb
$ pip install pygame
Now the python environment is ready. We could edit the path in our .bashrc file, but when we run we’re going to be in a cron job, which uses a different environment. So that we can have the same environment when we test and when we run as a cron, we’ll use a .sh file that sets up everything we need.
The last thing we need is the quack sound. I found one at https://pixabay.com/sound-effects/search/quack/ that is royalty free. I downloaded it and named it media/quack.mp3.
In order to talk to MotherDuck, all we need is an auth token. We don’t need to install anything else, DuckDB already knows how to do it. You can sign-up for MotherDuck for free and retrieve your token from the UI. If you haven’t signed up yet, you can sign up for a free trial (once the free trial is over, you can either sign up for billing or just stay on the free tier. The amount of MotherDuck usage here doesn’t come anywhere close to the free tier limits).
From the top left of the MotherDuck Web UI, click on your organization name and then “Settings”. In the settings pane click the big blue button that says “copy token”. This copies your auth token to the clipboard.
We’re going to want to create an environment variable MOTHERDUCK_TOKEN that has the value that is in the clipboard. You can type:
Copy code
export MOTHERDUCK_TOKEN=<paste your token here>
We’re going to use a shell script that has all of our settings so we can run it from the cron job. The shell script quack.sh should look like:
Copy code
export MOTHERDUCK_TOKEN=<your token here>
export XDG_RUNTIME_DIR="/run/user/1000"
export PYTHON_PATH=./.venv/bin
$PYTHON_PATH/python ./quack.py ./media/quack.mp3 >> ./quack.log
Paste your token into the first line and save the file.
There are four lines here, the first one sets your authentication token. The second one sets XDG_RUNTIME_DIR which is used by the bluetooth system. The third allows you to use the python libraries that were installed in a virtual environment earlier. Finally, we run the quack.py python script, point it at the quack.mp3 sound file, and write the results to a file called quack.log.
The python code is super simple. First it connects to a local DuckDB instance and creates a table where we’ll store accounts that we’ve seen before::
Copy code
create_table_sql = '''
CREATE TABLE IF NOT EXISTS accounts (org_id UUID, convert_ts TIMESTAMP)
'''
con = duckdb.connect('local.duckdb')
con.sql(create_table_sql)
We connect to a local DuckDB instance, local.duckdb. If that doesn’t exist, DuckDB will create it. Then we create a table that contains an organization id and the timestamp that the organization signed up for billing. We use IF NOT EXISTS to create the table because that lets us run the same thing for the first time we run and subsequent times, and we won’t get an error if the table already exists.
Next, we connect to MotherDuck and run our query. This is as simple as:
Copy code
con.sql("attach 'md:mdw'")
conversions_sql = '''
INSERT INTO accounts
WITH conversions AS (
SELEECT min(event_ts) AS convert_ts, organization_id
FROM mdw.main.events
WHERE event_name='org_updated_payment_method'
GROUP BY ALL
)
SELECT organization_id, convert_ts
FROM conversions_and_orgs
WHERE organization_id NOT IN (SELECT DISTINCT organization_id FROM accounts)
'''
results = con.execute(conversions_sql).fetchone()[0]
The first line, ’attach ‘md:mdw’, is all you need to connect to MotherDuck, as long as you have the MOTHERDUCK_TOKEN environment variable set correctly. The first part, md: tells DuckDB that we’re going to be using a MotherDuck database, and the second part, mdw is the name of the database we want to connect to. This is where we at MotherDuck store our events.
This is the same query we saw earlier. We’re running a query against both our local database (which has the list of accounts we’ve already seen) and the remote MotherDuck database (which has all of the accounts). We insert anything we haven’t seen into our local table. The result of an INSERT query is the number of rows inserted, so we can use that value to determine whether we want to play a sound.
Playing the sound is pretty simple, and the code is below:
Copy code
pygame.init()
sound = pygame.mixer.Sound(args.sound_file)
for _ in range(results):
channel = sound.play()
while channel.get_busy():
pygame.time.wait(100)
We need to initialize pygame, then create a Sound object from the quack.mp3 file. Then for each new account, we’ll play the sound once. The only thing non-intuitive is that the sound is played asynchronously, so we need to spin and wait until the sound finishes playing.
With that, we’re done with the code.
The last part is having this run every few minutes during working hours. We don’t want it to run outside of working hours, since no one will be around to hear the quacking. We can set a cron job to run every 10 minutes, 9am-5pm Monday through Friday. The crontab specification for this looks like:
Copy code
*/10 9-17 * * 1-5 sh /home/jordan/quack.sh
The first column is minutes, we have it run every minute that is divisible by 10. The second is hours of the day, we run during business hours, or 9-17. The next is days of the month, we want to run any business day of the month, so we enter a *. After that is the months of the year, we want to run every month, so again we have *. The last is the days of the week, and we want days 1-5, which is Monday-Friday.
To tell the system to run our script with this frequency, we use crontab. Type crontab -e and paste the above specification at the bottom.
After you save the crontab, you’re all set, and good to go and get quacking!
I brought the device into the office, plugged it into power, hooked it up to our guest wifi, and set it loose in an unobtrusive corner. Now we just wait and count the quacks and the “duck”ets will start rolling in!
Since DuckDB is an embedded database, it’s perfect for lightweight devices and these kinds of edge use cases. You get all the power of DuckDB running locally, while seamlessly pulling in cloud data and resources through MotherDuck’s dual query execution.
MotherDuck makes it easy to get started for free, so dive in, get creative, and keep on quacking!